How to Create Business Account ?
Business Account Creation for using of Tip Top Applications:
Business account is required to use any solution provided by us. This account is created and initiated by the existing user/ admin account already associated with Top Top Platform.
In this section we will explain the procedure for:
- How to create business account on platform
- How to register new account
- Software Release/ Subscription
- License Subscription/ Buying Software licenses
New User Registration
Software Subscription:
If any user willing to subscribe the Tip top solution, then he will be invited by the registered/ existing user.

Invitations send to new user
After click on invite option, an invite user page will open and we (invitee) fill credentials like First name, last name and email and click on "send invitation button" to send invitation to the user.

Kindly note registration invitation URL comes inside invitee mail box also, so if new user (invited person) does not have an email, he doesn't needs to worry about this.
URL generated in both (invitee and invited person’s mail boxes).
After click on invite button, Invitation URL comes into both invitee and user's account [invited person (if he provided his /her valid email id)].

Credentials to be entered by the user-
Once the user gets this URL, he needs to click on this and register page will open where information like (First name, last name and email) comes auto selected and rest information (username, password etc.) needs to be filled by the user.

Account Activation
Once he click on submit button an alert in green color generates with message "Success you are successfully registered, please verify your account. Thank you."

Then user will be activated successfully after click on submit button mentioned below the verification code.

User Login
Now user writes the URL tiptopmail.com and fills the credentials like “username, password and click on “sign in" button in the login page to login.
There are three field:
Company Name: only to be filled for company user who has been linked to the company
Username: for all users
Password: for all users
User will generally login without company Name as he is still not linked to any company

Buying Business License
After updating his/her profile successfully user Release for the Tiptop platform software.
User can click request demo from www.tiptopplanet.com
User will be sent a link for Buy license
User has to enter username and password and click on sign in button to login.

After logged in user navigates to the Buy License page

In this page user has to fill all the information mentioned like
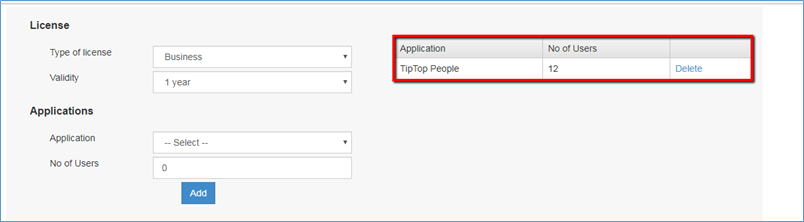
Type of license: Free Trial or License version.

Validity: For one year or more.

Application: Different categories of applications like Tiptop manager; Tiptop Office, Tiptop adviser etc. are given over there in drop down menu. These are the various applications we have and user can select the required application he wants to subscribe license for.

No of users: How many members would like to Release/ subscribe it

Then, click on add option mentioned below screenshot (Blue color button) then Application type, no of users show in the table.
User could also delete the "added user" if he wants to make some changes to Release the software.
After click on add button user will successfully add all mandatory information like type of application, no of users, validity and license type.
Apart from this, user needs to fill other general information too like company and contact person information. Company information like: Required information like company name, address, city, state, country, zip and website. Contact information like: Information like First name, last name, email, address, city, state, country and zip.

License Key Generation
After filling the entire information, clicked on save button an alert message will generate as "Success License key generated and has been mailed to your mail account."

You can check your mailbox for message of license key generation.

License activation
Here user has to click on "activate button" lies at bottom of Buy license page.

After clicking on "License Activate" button user enters License key, username and password. After enter all these credentials he clicks on check option.

Once user click on check button, rest data of user (like company information, contact person information and License) get auto selected (as filled by user previously in buy license page) and user clicks on Activate License button for the activation of license.

Once user click on Activate License button an alert generates as "Success License is activated."

Note: Admin assigned the connection string of current activated user by clicking "Assigned application to OU."

Tenant Organization Structure
After successful activation of license- New Company (Tenant name) is created (RDK).
Now user needs to login with the username and password entered in company field (Buy license) page.

Later doing this Tip Top Platform allows companies to create an Organization Chart without any actual employee based on designations. These designations are later linked to employee which connect them to the organization chart.
How to complete my profile ?
Tip Top People
Tip Top People is a Profile Management Platform where Users can maintain their profiles and employment Records.
There is a strong need of a De-coupled Profile Management platform where all the Human resources can maintain their own profiles reducing the load on the organization HR department where they simply have to just on one click on boarding the HRIS can automatically be updated.
The Tip Top People provides a Profile Platform that solves this major problem of the organizations.
The Platform provides following features:
- Profile Management
- CV Management
Once user account created on platform, user has to build his/ her personal profile on tiptoppeople.com
MY Profile
A) After logged in successfully with Tiptop mail, user will click on "My Profile" to edit his own profile.

Then he navigates to user profile homepage.
B) Another option for user is to directly go to our application as “tiptoppeople” and he can login into the same using his/ her credentials.

Personal Information:
After click on edit profile option user navigates to personal information page where name, surname and email address remains auto selected (already filled earlier) and rest all the information like DOB, Address, Gender, Marital status and etc. have to be filled by the user.
Also the user has to select ISPUBLIC checkbox for his profile to be visible to others

After filling the required information’s, click on save button.

Once clicked on save button an alert will generate like "Personal information saved successfully."

and after click on "Ok" button.
Qualification Information:
Once Personal Information saved, user navigates to Qualification page where first he has an option to select radio button "Are you eligible or not." with option yes and NA. User can choose these options accordingly. If suppose user selects ‘yes’ then he will be allowed to fill all the information like Institution, Aggregate, percentage etc. and click on insert button as shows in tabular form.

Simultaneously if user has more qualifications than he can fill accordingly in the same manner and that all will be reflected in a table. Once he fills entire qualification details and clicks on "save qualification button”, all qualification details will be saved and user navigates to experience section.
Experience Information:
Next tab will be for Experience Information, if user does not have any experience, he will have to click on ‘NA’ button and if user has any experience, than it will be added accordingly, these inserted record show in table by click on "Add experience button."

Again user clicks on save experience button and an alert will generate "experience saved successfully" and page navigates to reference section.
Reference Information:
In reference section user can give any reference of his / her known person by entering his/her name, last name, designation, company name and etc. After click on add reference button information will be shown in the table.
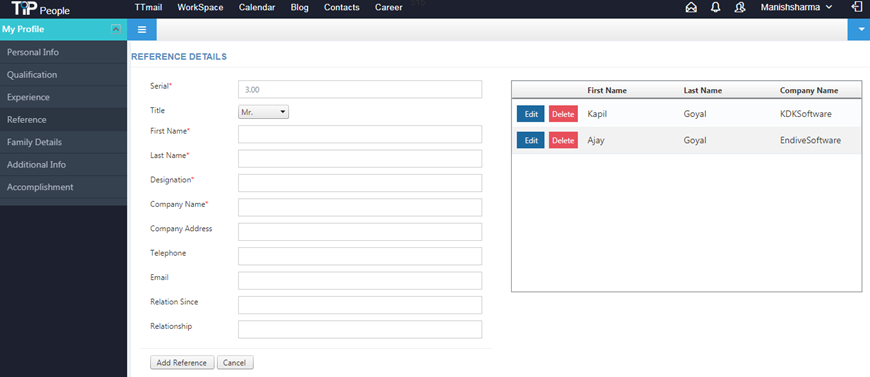
After filling the reference information user will have to click on "save reference button" and an alert will generate "reference information saved successfully." After click on "OK" button user will navigates to family details section.
Family Information:
In family details user defines about his/her marital status and details about his family members and relationships.

Again information entered by the user will be shown in table and he saves it accordingly by click on "save family details" option.

Additional Information:
In additional information option user fills all the information related to his/her career goals, most motivated work, strong points etc.

At any time user can choose desired record type form the dropdown menu and can write the description about the selected particular category.
After filling all information user clicks on save information page, alert generates as "Additional information saved successfully."
After click on ‘OK’ button again an alert message generates as “Your profile is updated successfully. Changes will reflect after sometime or after re login to your application. Do you want to re login?"

If user click on "No" button then he will remains in the same page and if clicks on "Yes" it navigates to index page of tiptoppeople.com
How to Register as Tiptop User ?
1. Overview
The Tip Top Platform is a free e-mail service powered by TTMail. Tip Top Platform has offered users innovative features such as a free storage, built-in search functions and message groupings and providing a centralized place from where user registration can be created, giving each user a unique identity in whole platform ecosystem.
This module covers the sequential flow of User Registration on Tip Top Platform.
2. How to Register as Tip Top User ?
This is module will demonstrate as How a User register in Tip Top Platform Site? 2.1 Open Browser and Enter tiptopsoftware.net.
Please user Browser Chrome or Mozilla Firefox or Safari (For Mac user)

2.2 Click on User Button on Site

2.3 When Click on User Button, following options shows; Registration, Change Password and Edit Profile. Click on Registration Button

2.4 Once click on Registration Button, the following Register Form will display for user to enter details for registration.

2.5 Register Form – Fill all mandatory Fields and Save

All fields are mandatory and when user filled all fields on Register Form, Click on Save Button.
For Reset the regitration details, click on Reset Button.
Few Validation on Register Form Fields Like;
A. Email:
Format should by This email address is being protected from spambots. You need JavaScript enabled to view it. or This email address is being protected from spambots. You need JavaScript enabled to view it. or This email address is being protected from spambots. You need JavaScript enabled to view it. or This email address is being protected from spambots. You need JavaScript enabled to view it.
B. Security Question:
The security question must be at least 6 characters long.
C. Answer:
The answer must be at least 6 characters long.
D. Password:
Password must contain at least one uppercase, one special and one numeric character.
E. Confirm password:
Confirm password should be similar as entered in Password field.
All fields are mandatory and when user filled all fields on Register Form, Click on Save Button.
For Reset the Registration, click on Reset Button.
2.6 User Verification
When click on Save button, page highlighting user verification code.
User Verification Code: Alpha Numeric code generated for user registration purpose and a copy is automatically send to user email address provided in Register Form - Alternate email field.

2.7 Click on Submit Button and receive acknowledgment Thank You message on successful registered shows completion of Registration Process on http://tiptopsoftwares.net. Check for User Registration Details and verification code on alternate Email address provided on Register Form.

Once successfully register on tiptopsoftwares.net, user can opt for registering as Business user or Go To Tip Top People Site for updating profile.
For registering as Business user – Go To Option: Business User Registration Module Only applicable for Business User.
v For Updating profile – Go To Option: Step 4.
Click on People Button and Follow Step 4.
How to Change Password
- Click User Button on tiptopsoftwares.net

- Click on Change Password Button

- Enter Current Password, Enter New password and Confirm Password.
Confirm password should be same as new password
Note –
Password must contain at least one uppercase, one special and one numeric character.
Current Password and New password cannot be same.

Once Click on Save the New Password will be updated.
How to Use TTP Mobile App
Authentication using Human identification, location Tracking and Time Recording Service (AHLTS)
Mobile Attendance Application
API driven Integrated and AI based Mobile Attendance and Human Asset Tracking Application
Attendance Application:
Overcome the problems of tracking your employees through our efficiently designed location based attendance application, real time tracking features to support Geo-fencing and Real Time Geo-tracking which delivers a guaranteed productivity from your workforce.
What we deliver with Attendance Apps:
Maintain records of punch timing along with the location data of respective employees to ensure the effective time utilization and avoid any kind of time thefts. With the implementation of our attendance apps can track employees who are working in the office as well who are field workers, get their punch timings and punch location tracking easily within a single window.
1. Increase Productivity
Increase transparency of working scenarios with real time location tracking which allows managers to give instructions for taking out productive work from employees.
2. Real Time Location/ Live Location Ping and instant messaging
Get the current location and route details of your employees on fields or are on business trips using ping service. On real time basis employee/ supervisor can share or request to share his/ her live location to supervisor/ manager to guide them for better working and improved efficiency.
3. User/ Employee Authenticity validation using Bio Matric and Device Mac Address
Authenticate user by his/ her own Mobile device while marking his/ her attendance along with finger scanning. It will safe guard from proxy attendance marking.
4. Auto Punching in Office
With location based punching you can virtually fence all your office premises to enable auto punching with your employees mobile devices along with respective locations.
5. Multiple Platform
We have made our application to support any kind of mobile devices on platforms like Android and iOS so that you can install it on any mobile devices, or tablets of any brands.
What to expect from Tip Top’s Mobile Attendance App Solution?
Tip Top’s Mobile Attendance solution is robust and efficient and designed for all type of industries. Your company can manage employee’s attendance, payroll cycle & performance analysis from Tip Top’s centralized cloud-based attendance app which is 24 X 7 accessible and scalable.
Tip Top Mobile App User Manual
Application is currently working for Geo Fencing, Bio Metric, NFC Tag, Mobile Device Mac address and for Manual Attendance user validation and for punching their attendance.
Registration Process:
A) Location Registration
B) Finger Registration (Bio Metric Registration)
C) Mobile Mac Address Registration
D) NFC Tag Registration
A) Registering Location using Mobile App:
- Initially for using Geo Fencing Location tracking and authentication services, we need to register Location first.
- For Registering Location: Only Administrator/ Supervisor are authorized to do so. (User Roles and Permission needs to be set from Tip Top Platform)
- Admin/ Supervisor will login into the application using his/her TT Mail credentials.
- Initially for using Geo Fencing Location tracking and authentication services, we need to register Location first.
- As this app is API driven, so automatically we will have Locations which was already there into the web application.
- Already available Locations, now needs to be registered as Parent location. And inside that parent location we can define sub locations too which comes under that parent location radial area.
How to Register Location:
- To register any location, only administrator having the rights. So he will login with his/her Admin credentials into tiptop mobile application

- Enter company name in first text box as indication to, Enter user name and password than click on Sign In button given at the login page of this app.
- Once Logged in, at the bottom of app menu open “Register Location” menu item.

- After click on Register Location Menu item, the concern page will be displayed with the available text fields as Location Name. Parent Location, Category, Department, Fence Radius and Status etc.

- In place of Parent Location drop down menu, it will display the name of locations which is already open/ available to get registered. So admin needs to register Parent Location first through the mobile app.
- Select Location to register from drop down menu (existing locations will be displayed in drop down)

- Select the Category from the drop down as Indoor or Outdoor.

- Select the department where this particular Location falls in or relate to. Department list will be displayed in drop down menu.

- Once Location is selected than app will automatically fetch its longitude and latitude and it will be displayed in the space provided already in app.
- Enter the geo fence area (radial geo fence distance needs to be entered here- it must be set from the central point of registering location in meters only)

- App will automatically get the longitude and latitude of that particular location and then click on ‘SAVE’ button given at the bottom of this page.
- “Location successfully registered” alert will be displayed.
- Now the parents’ location has been registered successfully.
- Once parent location gets registered successfully, now we need to register Sub locations under that registered Parent location geo fence.
For Registering Sub Location under Registered Parent Location:
- Enter the name of Sub Location in text box as given

- Select the registered parent location from drop down menu under which this Sub location comes (within the registered and assigned Geo Fence Radios of parent location)
- Like if Parent location’s radius is 30 Meters than its sub location should be within that 30 meters (5-10 meters under that geo fence)/ if sub location is outside of Parent location geo fence then app will throw an alert message that “Sub location must be in Parent location fence area”.
- Enter the sub location fence radius are and fill the required details on that page.
- Click on ‘SAVE’ button and then an alert message will pop up like location registered successfully.
B) Register Fingers of Employee (For Bio Metric Authentication and Validation)
- Administrator is having rights to register employee’s fingers through the mobile app.
- Admin will login with his/ her credentials into the app.
- By selecting Employee Registration Menu: He needs to select Name of Employee from the drop down (In drop down all the available and assigned employee’s name will be displayed and admin can search particular employee name from there)

- Admin will select the name of employee whose Fingers he is going to register
- All available employees’ list will be displayed in drop down menu, and admin can select the name of employee who’s Finger he want to register using app.

- Once Employee name is selected its associated Employee ID will be displayed in the text box given.

- On the next option, app will ask to select the mode of attendance, admin want to register for.

- Here, the list will be displayed for the permissions which admin has already granted to this particular user to punch his/ her daily attendance.
- For finger registration, admin needs to select Bio metric option from the drop down.
- Once Bio Metric option is selected from the drop down menu, this will give pictorial option to select the number of fingner along with right or left hand selection.
- Which ever Finger employee want to register for himself, admin needs to select that finger number from the given option, admin will click the particular finger number as per given hand.

- Initially the color of all fingers will be displayed in RED color as they are unregistered fingers in app, while once any finger gets registered this will be displayed in GREEN color.
- For Registering finger, Admin needs to attach Mobile device with Bio Metric Attendance device (We have used StarTek FM 220U device for the same which is Aadhar approved device already)
- Once we attach Bio Metric device with the Mobile, it given an alert to allow the device to communicate with the app, so user needs to click on allow button.

- Once admin selected the number of finger, employee needs to put his selected and right finger on the space provided for scanning.

- Once employee puts his appropriate finger on Bio Metric device, app start scanning and registering that finger.

- Once scan completed, app displays a message as “ Finger Scanned Successfully”

- Once finger scanned successfully, admin will click on Save button and this will save the finger data inside the app for particular employee. (Finger Registered Successfully now)
- Admin and employee can register multiple fingers using this app, and the registered fingers will be displayed in GREEN color while un registered will be displayed in RED color.
C) Mobile Mac Address Registration through App:
For validating attendance we have Mobile Mac address validation too. In which Employees’ Mobile Mac address will be registered using app, so that employee will be able to punch his/ her attendance by using his/ her registered Mobile device only. So this will validate and authenticate the employee for punching his/ her attendance.
- For registering employees’ Mobile Mac address, admin/ supervisor will login on the app (Employees’ Mobile app) with his/ her login credentials
- Admin/ Supervisor needs to select the employee name from the drop down menu for whose Mobile Mac address he is going to register/ mobile belongs to which particular employee.
- By selecting Employee Registration Menu: He needs to select Name of Employee from the drop down (In drop down all the available employee’s name will be displayed as it is coming from Employee Master Data API from Back end)

- Admin will select the name of employee who’s Mobile Mac Address he is going to register from the drop down menu.

- Once Employee name is selected its associated Employee ID will be displayed in the text box given.

- On the next option, app will ask to select the mode of attendance, admin want to register for.

- Here, the list will be displayed for the permissions which admin has already granted to this particular user to punch his/ her daily attendance.
- Here, admin will select “Device Mac Address” option.

- Once Device Mac Address option is selected from the drop down menu, this will automatically fetch the Mobile Device Mac Address and will display the same on given text box.
- Admin will click on ‘SAVE’ button to save this Mac Address for respective employee.
- This way employee will be able to punch his/ her attendance through only registered Mobile device.
E) NFC Tag Registration
Location Aware Services-
The location aware services can be used to acquire a user’s location. Employee/ User’s position can be still determined using mobile phone with the help of NFC (Near-field communication) positioning devices. On selecting NFC, supervisor manually insert/write data inside the NFC Tag and its location need to be registered first against any employee who is allowed by the administrator to punch his/ her attendance from any particular location only. NFC tag needs to be write/ value need to be inserted by the Admin inside the NFC tag regarding employee Name, Location and Category where such employee is allowed to present physically to punch his/ her attendance.
- Admin will login with his/ her credentials into the mobile app.
- Once admin logged in, he will go for employee registration menu icon.

- Here, Admin will write the data/ registered employee details, location and category inside the NFC tag.
- First admin/ Supervisor will select the name of employee from the drop down who is allowed to punch his/ her attendance through NFC Tag.

- Employee’s associated Employee ID will be displayed once employee name selected from drop down menu.
- Admin will select the mode of attendance he is allowed from ‘Select type of attendance/ mode of attendance. Here admin will select NFC type.
- Once NFC Tag mode is selected, Employee Registration page will open.

- On Employee Registration page, admin will select the Supervisor name from the given drop down menu.
- Location category need to select from second drop down menu as Indoor or Outdoor.
- At Select Location, admin need to select the location name which is already there in drop down menu item. These location manes will come from tiptop platform back end only. The NFC Tag will be written from here with the values including the location where NFC tag need to be fixed, Employee name who is registered for that location to punch his/ her attendance etc.

- Finally admin will select the type of NFC Tag he is writing inside with the provided values.

- Once admin puts the required information regarding Employee Registration and NFC Tag details, he needs to write the same into the NFC Tag. For writing those parameters into the NFC Tag, Mobile with app need to be in the range of that NFC Tag. Means as NFC Tag will come near to that mobile device, app will automatically display the alert that “NFC Tag Found”, and now admin will click on SAVE button to write those parameters into the NFC Tag.

- Once saved all those parameters, app will display the alert like “Tag Written Successfully”. By this way Employee and Tag will get registered into the App.

: Attendance Check In/ Check out Process:
Once Employee get registered for Location, Device Mac Address, NFC Tag and by Bio metric device finger registration, now employee can check in/ checkout from the Mobile app with the attendance rights he is allowed to do so.
For User Validation and authentication, we have provided multiple combination methods of user validation or authentication. Admin or organization can use any method of check in/ check out independently or in combination.
Attendance Check in / Check Out process through available or allowed Methods:
A) Attendance process using Bio Metric, Location, Device Mac Address method (combination of 3 validation)
- If employee is already registered and allowed by the administration/ supervisor for Bio Metric, Location and device mac address method of attendance check in/ checkout, he will login with his own credentials into the mobile app.
- For punching attendance he will have to select check/ checkout menu item from the home screen.

- Once user clicks on this icon, this will give the page to mark his/ her attendance.

- Here, employee will select type of attendance/ mode of attendance, he is allowed for.

- Once employee selects his/ her mode of attendance, complete page of check in/ check out will be displayed.
- Now on second option, employee need to select the location from the drop down (location), he is already registered for punching his/ her attendance by the admin.
- If employee is allowed to mark his/ her attendance from multiple locations. Then here in drop down he need to select the location currently he want to punch his/ her attendance at that moment. Otherwise if he is allowed to mark attendance from single registered location that it will come by default in that text box.

- Once user selects his current location to mark his attendance, app will automatically fetch his current location for which he was registered for. We have incorporated Google location map inside the app to display the live location of employee. If employee is within the registered geo location range, than google map will show the pin location. If employee is outside of the fence area, than app/ google map will show the employee location as out of defined geo fence area. Out of fence area app will not allow the employee to mark his/ her attendance and will display the alert as first “Go inside the fence area to mark your attendance”.

- If user is inside the defined and registered geo fence area, than app will validate his location automatically.
- Now user need to connect his mobile device with Bio Metric attendance device, once user connects the bio metric device with the mobile, it will give an alert to allow the device to communicate with the mobile app. User will click on OK button to give the access permission.

- Now user will use his/ her registered fingers to scan for marking his check in or check out. Registered fingers will be shown in GREEN Color while unregistered finger will be shown in RED color.
- If more than one fingers are registered already inside the app, than user will select the number of finger he want to use for marking his attendance from the given picture of hand. Once user choose the particular finger, its finder ID will be saved inside the text box provided.

- No user will go for check in or check out of his/ her attendance. First time only Check In button will be enabled to mark check in only and check out button will be disabled. (without marking check in, check out is not justified)
- Once user click on check in button, automatically Bio Metric device scanning panel activated, and app will display an alert message to user to put his registered finger on scanning device to match his finger with the already registered finger.

- Once user’s finger gets match with the Registered Finger, app will display the message like” Scan Matched”
- Once scan matched, app will again display an Alert with “Attendance Checked in” with Date and time of attendance marked. And by this way user will be able to mark his/ her attendance.

- Once attendance is marked, it will be displayed in the Grid provided to record the attendance data along with Date, Check in/ Check out time, and with location including its latitude/longitude.

- The same procedure will be used while user wants to mark his/ her check out.
- One more validation will work simultaneously along with Location and Finger validation which is Device Mac Address.
- Until and unless user is using his registered mobile device (Registered by Mac Address), he/ she will not be able to mark his attendance. Mobile Mac Address authentication is also associated with this attendance combination. App will allow only if authentic and registered mobile device is used to mark the attendance, otherwise app will again display an alert like: “Device Mac Address not matched”
B) Attendance process using NFC Tag Method
If particular employee is registered to mark his/ her attendance through NFC Tag only, than user needs to tap his mobile device near or onto the NFC Tag, so that mobile app will read the data available inside and written inside the tag in order to validate the user and its location. In this case user needs to be present physically very near to NFC device for validation and authenticity of its attendance at that particular location/ area.
- User needs to go near the registered and placed NFC area first.
- Now, user will login into the mobile app using his/ her login credentials.
- User needs to select the check in / checkout option from the available menu item from home screen.
- Once he select the check in/ check out menu, attendance marking page will be displayed.

- Now, user needs to select type of attendance/ mode of attendance from the drop down menu.
- In case of NFC method of attendance, app will display this mode inside this text box.

- Once user select NFC method of attendance mode, he need to be very near to FFC Tag so that mobile app can read the data available inside the NFC tag to verify the user’s actual location and NFC tag’s location.
- As user come within the range of NFC Tag app will display an alert that” NFC Tag Found”

- If user taps his mobile device onto or near the NFC Tag, app will read the data and validate the same and now user will be able to mark his/ her attendance.
- User will click on check in/ check out button to mark his/ her attendance, and again an alert message will come as ““Attendance Checked in” with Date and time of attendance marked. And by this way user will be able to mark his/ her attendance.

- In case user is away from the NFC Tag, than app will throw an alert message like” NGC Tag not connected. Please wait or move your device position near the NFC Tag”

C) Attendance process using Device Mac Address:
Device Mac address is another way to validate Employee’s device from which he/ she is allowed to mark his/ her attendance. Using unregistered mobile device user will not be able to mark his attendance. So by this way it will again validate and authenticate user who is marking attendance. Admin can restrict employee to mark his attendance by using his own mobile device and this will improve authenticity of user and marked attendance too as every mobile device has unique ID as Mac address.
- For check in/ check out user will login with his login credentials.
- User will select Check in/ check out menu item from the home screen.
- First user has to select the option/ method he is allowed to mark his/ her attendance. In this case user has to select Device Mac Address method to do so.

- Once that method of attendance is selected by the user from drop down, it will not give an option to check in/ checkout attendance using the buttons.
- User will click on Check In button to mark his/ her attendance.
- App will check/ validate the Device Mac address in back ground, and if validated and registered Device is found it will allow check in or checkout.

- If registered device not found, than at the time of check in/ check out app will display an alert message like “Device Mac Address doesn’t matched”

D) Attendance process using Geo Location:
- User will login using his/ her login credentials into the mobile app and select the attendance check in/ check out option from menu item.
- First user has to select the option/ method he is allowed to mark his/ her attendance. In this case user has to select Geo Location method to do so.

- Once that method of attendance is selected by the user from drop down, it will give an option to select the location from where he is willing to check in or heck out or the location he is allowed to mark his attendance. If multiple locations are allowed to him than he will select the location where he is standing at that moment. If only single location is allowed to him than that location will be displayed by default to him.

- User will click on Check In button to mark his/ her attendance.
- Once the location has been selected by the user, app will automatically validate his current location that weather he is in defined and registered geo fence or not. Using google geo location map and latitude/ longitude.
- If the user is in defined geo fence area than he/ she will be able to mark his/ her attendance.
- User will click on Check in/ check out button to mark his/ her attendance.
- Finally, he will be able to mark the attendance successfully.

- If user is out of defined and registered geo location, app will throw an alert like ”Please go inside the geo fence area to mark your attendance”
Supervisor Mode of Attendance Check-in/ Checkout
This functionality is provided for user to punch their attendance without Login into the application using their individual login credentials. (Quite similar like Bio Metric machine attendance system)
Once Admin/ Supervisor login into the app using his/ her own login credentials, all the staff members/ users list will be displayed (all the allowed and under his supervision staff list). Now all the relevant staff members can punch their attendance using that supervisor login.
- Supervisor login into the app using his/ her login credentials.
- Supervisor will click on Right most top icon available on home screen post login.

- Here, on supervisor mode of attendance scree, user will get an option to select his/ her name from the given drop down menu.

- Once user selects his/ her name from the drop down, user will select the type of attendance he is allowed or registered already to do so from the drop down.
- Only the permission/ allowed type of attendance type will be displayed there in drop down menu for which particular user has been allowed and registered.

- Once user selects the type of attendance type, the respective method of check in/ check out will be displayed.
- User will follow the instructions and procedure to mark his/ her attendance as per the pre explained methods.
- Once user check in/ check out, an alert message containing check in/ check out time of successfully punching will be displayed.
- Once first user checks in/ checks out the screen will be again in fresh mode of attendance punching from where another user has to select his/ her name from the drop down to mark his/ her attendance as explained above.
Check In/ Check Out using Mobile’s Finger Scanner
This functionality for check in and check out will work in case particular employee is using his/ her personal Mobile phone to mark attendance and if Finger Scan feature is inbuilt inside the mobile phone as now a days most of the mobile phones having such facility.
The user can mark his attendance using the same finger which is already registered with his mobile’ finger scanner, if user has not registered his finger using mobile’ finger scanner than first needs to register the same before using this app for check in/ check out.
Once user is registered with the finger than the below steps will allow him/her to mark the attendance using Tip Top Mobile app.
- Once user log in into the app and go to attendance check in / check out page.
- Here, user need to select the type of attendance/ mode of attendance, allowed and registered mode will be displayed in drop down and user will select the same.

- Once type of attendance is selected, its relevant options will be displayed inside the app.

- If Bio metric attendance mode is allowed to this user, than app will ask about type of finger print device user want to use for check in/ check out.

- If user select the type of device as Scan through Mobile than app will allow him to punch his/ her attendance using his Mobile’ Finger Scanner.
- User will click on Check in button and app will show the alert to use Mobile’ Finger Scanner in order to scan the registered finger.

- Here, app will identify and validate the scanner finger (user will touch the mobile’s finger scanner using his registered finger) and if the correct and registered finger is scanned, than attendance will be marked successfully and an alert message will be displayed containing the time of attendance check in/ check out.

- If user does not scan the registered or correct finger than app will display an alert to use the right finger to mark attendance.
How to Use FRM
Resource Management
Resource management is the process of pre-planning, scheduling, and allocating your resources to maximize efficiency.
This is the process by which businesses manage their various resources effectively. Those resources can be intangible – people and time – and tangible – equipment, materials, and finances. It involves planning so that the right resources are assigned to the right tasks. Managing resources involves schedules and budgets for people, projects, equipment, and supplies.
Resource Entry Process
- Resource Need
- Purchase Approval – By Committee
- Purchase Order
- Material Received
- Resource Register Entry
Process Flow:

Resource Category:
This is used to:
1. List resource categories
2. Create new resource categories
3. Edit a resource categories
4. Delete (soft delete) resource categories
Using this form admin can create and store Resource Category. This form will be displayed to user only if permission to view resource categories, is provided for logged in user.

- Admin will enter the name of Resource Category first and will enter the description about that resource.
- Resource specification if available than that has to be entered there in Specification text box.
- Admin will select the company under which that resource belongs and finally he has to put that resource as Active category and finally he will insert that record.
Resource Sub Category:
This is used to:
1. List resource subcategories
2. Create new resource subcategories
3. Edit a resource subcategories
4. Delete (soft delete) resource subcategories
Using this form, admin will create sub category of resource under available resource.

- Admin will enter the sub category name, its description and specification at given text boxes.
- Then admin will select the major category of resource under which that sub category comes.
- After this department has to be selected for which that particular resource belongs.
- Making this resource active, admin will click on insert button to insert and to save this record type.
Resource Group:
This is used to:
1. List resource groups
2. Create new resource groups
3. Edit a resource groups
4. Delete (soft delete) resource groups
Here, admin can define the owner of any particular resource under resource category and sub category.

- Admin will enter Group name, Description and its specification inside the text boxes given.
- Admin will select the Resource category, Sub category and will select the owner from the drop down menu item.
- Admin click on Active button and insert the group name.
Resource item Name:
This form will be used to enter the available resource names based on category and sub category. Those resources are further available for allocation to employees.

- First admin will enter the name of resource along with its description and specification.
- Admin will select resource category and sub category from the given drop down menu item.
- Resource group will also be selected from the drop down.
- Admin will give the sequence number to that particular resource too and will make it active and click on insert button to save that record.
Resource Specification:
This is used to:
1. List resource specification groups
2. Create new resource specification groups
3. Edit a resource specification groups
4. Delete (soft delete) resource specification groups
Using this form, specification parameters can be defined by admin user.

- At Name field use can define the parameter name /specification name as brand, color, dimension, life etc.
- User will enter the description and make this active to get this available in resource library.
Resource Item List:
This is used to:
1. List resource items
2. Create new resource items
3. Edit a resource items
4. Delete (soft delete) resource items
This is the major form, from where any resource full details have to maintain. User will define resource’s general details, purchase detail, risk factor and specification in this form.

In general tab:
- First user will select category of resource from drop down than will select group, department, location, and resource’s sub category.
- User will enter the Item code and select the item type.
- User will select resource location and owner from the drop down menu too.
- Bar code and equipment ID will be entered by user here.
- Here, also user can define resource specification and its description and finally will click on save button to save this resource item.
Purchase Details:
Here user will enter the resource purchase details like invoice details, resource life etc.

- User will enter the Invoice Number, Invoice date in this form
- User has to select the vendor from the drop down menu.
- Select the depreciation method against that particular resource, enter the quality purchased, units, and life cycle of that resource, its functions etc.
Risk cover:
- Here user need to provide resource’s risk factor like insurance details, insurance start and end date, risk type like insurance, AMC or warranty and cost need to pay against that cover.

Specification:
- In this tab user will enter the specification based on pre define parameters.

- User will select the parameter of specification from the drop down menu and enter the details against that specification parameter.
Resource Transfer:
- Using this form, user can transfer, update resource location and ownership.
- Here, first user need to select “Transfer own to” name from the drop down, this feature is locked by the password so here admin will need to enter password ‘for transfer’ to and ‘transfer by’ than he will click on continue option.

- On this form, admin will select the category, group item name, sub category of that particular resource he want to transfer.
- Based on given and searched resource, its current location, department will come automatically in the provided text boxes.
- Now admin can define its new location and select the new owner from the drop down menu and then click on Insert button to update this record and finally admin will click on Transfer button to transfer existing resource to new owner and new location.
How to Use Tip Top Platform
TIPTOP PLATFORM USER DOCUMENT
Tiptop Platform is a comprehensive business management application platform buildup of diversified tools in order to smoothing enterprise workflow.
It's a comprehensive business management platform application packed up with Organizational structuring, tenant organization setup and role/title allocation within the company.
Major Workflow/ Functionalities available inside Tip Top Platform are:-
a) New User Registration (Through tiptopmail.com)
b) Software Release/ Subscription (User Account Creation)
c) User Profile Management (My Profile- through tiptoppeople.com)
d) Employee Administration (Personal Info, Qualification, Experience, Reference, Family Details, Additional info etc.)
e) License Subscription/ Buying Software licenses
f) Organization Structuring/ Creation Tenant org. structuring
g) Company Setup: Organization setup, Unit (department setup), Role-Designation mapping, Title assignment-mapping
h) Application setup
i) Role Management
j) Authentication with SSO
k) Authorization
l) Page level permission Management
m) Dynamic Mean Management
n) Database base connection Management
o) Application API Engine
p) Custom API development
q) Communication Pipeline
r) Data sync services
New User Registration Platform
Software Subscription:
If any user willing to subscribe the Tip top solution, then he will be invited by the registered/ existing user.

Invitations send to new user
After click on invite option, an invite user page will open and we (invitee) fill credentials like First name, last name and email and click on "send invitation button" to send invitation to the user.

Kindly note registration invitation URL comes inside invitee mail box also, so if new user (invited person) does not have an email, he doesn't needs to worry about this.
URL generated in both (invitee and invited person’s mail boxes).
After click on invite button, Invitation URL comes into both invitee and user's account [invited person (if he provided his /her valid email id)].

Credentials to be entered by the user-
Once the user gets this URL, he needs to click on this and register page will open where information like (First name, last name and email) comes auto selected and rest information(username, password etc.) needs to be filled by the user.
Account Activation
Once he click on submit button an alert in green color generates with message "Success you are successfully registered, please verify your account. Thank you."

Then user will be activated successfully after click on submit button mentioned below the verification code.

User Login
Now user writes the URL tiptopmail.com and fills the credentials like “username, password and click on “sign in" button in the login page to login.
There are three fields
Company Name: only to be filled for company user who has been linked to the company
Username : for all users
Password : for all users
User will generally login without company Name as he is still not linked to any company

MY Profile
After logged in successfully with Tiptop mail, user will click on "My Profile" to edit his own profile.

Then he navigates to user profile homepage.

After click on edit profile option user navigates to personal information page where name, surname and email address remains auto selected (already filled earlier) and rest all the information like DOB, Address, Gender, Marital status and etc. have to be filled by the user.
Also the user has to select IS PUBLIC check box for his profile to be visible to others

After filling the required information’s, click on save button.

Once clicked on save button an alert will generate like "Personal information saved successfully."

and after click on "Ok" button user navigates to Qualification page where first he has an option to select radio button "Are you eligible or not." with option yes and NA. User can choose these options accordingly. If suppose user selects ‘yes’ then he will be allowed to fill all the information like Institution, Aggregate, percentage etc. and click on insert button as shows in tabular form.

Simultaneously if user has more qualifications than he can fill accordingly in the same manner and that all will be reflected in a table. Once he fills entire qualification details and clicks on "save qualification button", all qualification details will be saved and user navigates to experience section.
Now here,
If user does not have any experience, he will have to click on ‘NA’ button and if user has any experience, than it will be added accordingly, these inserted record show in table by click on "Add experience button."

Again user clicks on save experience button and an alert will generate "experience saved successfully" and page navigates to reference section.
In reference section user can give any reference of his / her known person by entering his/her name, last name, designation, company name and etc. After click on add reference button information will be shown in the table.

After filling the reference information user will have to click on "save reference button" and an alert will generate "reference information saved successfully." After click on "OK" button user will navigates to family details section.
In family details user defines about his/her marital status and details about his family members and relationships.

Again information entered by the user will be shown in table and he saves it accordingly by click on "save family details" option.

In additional information option user fills all the information related to his/her career goals, most motivated work, strong points etc.

At any time user can choose desired record type form the dropdown menu and can write the description about the selected particular category.
After filling all information user clicks on save information page, alert generates as "Additional information saved successfully."
After click on ‘OK’ button again an alert message generates as “Your profile is updated successfully. Changes will reflect after sometime or after re login to your application. Do you want to re login?"

If user click on "No" button then he will remains in the same page and if clicks on "Yes" it navigates to index page of tiptop mail.

Buying Business License
After updating his/her profile successfully user Release for the Tiptop platform software.
User can click request demo fromwww.tiptopplanet.com
User will be sent a link for Buy license
User has to enter username and password and click on sign in button to login.

After logged in user navigates to the Buy License page

In this page user has to fill all the information mentioned like
Type of license: Free Trial or License version.

Validity: For one year or more.

Application: Different categories of applications like Tiptop manager; Tiptop Office, Tiptop advisor etc. are given over there in drop down menu. These are the various applications we have and user can select the required application he wants to subscribe license for.

No of users: How many members would like to Release/ subscribe it

Then, click on add option mentioned below screenshot (Blue color button) then Application type, no of users show in the table.
User could also delete the "added user" if he wants to make some changes to Release the software.

After click on add button user will successfully add all mandatory information like type of application, no of users, validity and license type.
Apart from this, user needs to fill other general information too like company and contact person information. Company information like: Required information like company name, address, city, state, country, zip and website. Contact information like: Information like First name, last name, email, address, city, state, country and zip.

License Key Generation
After filling the entire information, clicked on save button an alert message will generate as "Success License key generated and has been mailed to your mail account."

You can check your mailbox for message of license key generation.

License activation
Here user has to click on "activate button" lies at bottom of Buy license page.

After clicking on "License Activate" button user enters License key, username and password. After enter all these credentials he clicks on check option.

Once user click on check button, rest data of user (like company information, contact person information and License) get auto selected (as filled by user previously in buy license page) and user clicks on Activate License button for the activation of license.

Once user click on Activate License button an alert generates as "Success License is activated."

Note: Admin assigned the connection string of current activated user by clicking "Assigned application to OU."

Tenant Organization Structure
After successful activation of license- New Company (Tenant name) is created (RDK).
Now user needs to login with the username and password entered in company field (Buy license) page.

Create Organization Chart
Tip Top Platform allows companies to create an Organization Chart without any actual employee based on designations
These designations are later linked to employee which connect them to the organization chart
Click on Tenant Organization Structure and select tenant in which company needs to be created.

Organization structure creation
Click on Organization Chart for selected Tenant.

And Click on Add Child.
Note: First Initial Parent Company will be created by Tiptop Platform at the time of licensing.
To Create New Company (COMPANY FORM)

Form consist of following field which are all mandatory.
- Type: Showing list of organization structure i.e. COMPANY, REGION (Department) and JOBID (Designation). Select " COMPANY". Fig. Below

- Full Name: Enter Company Full Name
- Short Name: Enter Company Short Name
- Email: Enter Company Email Address
- Parent Name: By Default will show Parent Company Name in which organization structure need to create.
- Check box (Address is same as the parent organization unit) -
- 1. CHECK BOX TICK : For Filling address field automatically if Parent Company Address same or
- 2. CHECK BOX UN TICK: Will free all address fields for entering address which is not similar to Parent Company address.
- Address1: Enter Company Address
- Address 2: Enter Company Address
- City/Town: Enter Company City/ Town Name
- State/Province: Enter Company State Name
- Country: Enter Company Country Name
- ZIP: Enter Company ZIP
- Description: Enter Description to Update any Detail related to Company Specification, etc.
- City/Town: Enter Company City/ Town Name
- Save: Click "SAVE" to update the fields
- Cancel: Click "CANCEL" to cancel all fields details entered.

Newly created Company will be Shown in Organization Structure.

To update REGION (Department) within the Company, Click on Company from Organization Structure and Click on "ADD CHILD" Button.
To Create New REGION (Department) - REGION FORM

Form consist of following field which are all mandatory.
- Type: Showing list of organization structure i.e. COMPANY, REGION (Department) and JOBID (Designation). Select " REGION". Fig. Below

- Full Name: Enter Region Full Name
- Short Name: Enter Region Short Name
- Email: Enter Region Email Address
- Parent Name: By Default will show Parent Company Name in which organization structure need to create.
- Check box (Address is same as the parent organization unit) -
- 1. CHECK BOX TICK : For Filling address field automatically if Parent Company Address same or
- 2. CHECK BOX UN TICK: Will free all address fields for entering address which is not similar to Parent Company address.
- Address1: Enter Region Address
- Address 2: Enter Region Address
- City/Town: Enter Region City/ Town Name
- State/Province: Enter Region State Name
- Country: Enter Region Country Name
- ZIP: Enter Region ZIP
- Description: Enter Description to update any Detail related to Region Specification, etc.
- Save: Click "SAVE" to update the fields
- Cancel: Click "CANCEL" to cancel all fields details entered.

To update JOBID (Designation) within REGION, Click on Company and Region from Organization Structure and Click on "ADD CHILD" Button.
To Create New JOBID (Designation) - JOBID FORM

Form consist of following field which are all mandatory.
- Type: Showing list of organization structure i.e. COMPANY, REGION (Department) and JOBID (Designation). Select " JOBID". Fig. Below

- Full Name: Enter JOBID Full Name
- Short Name: Enter JOBID Short Name
- Email: Enter JOBID Email Address
- Parent Name: By Default will show Parent Company Name in which organization structure need to create.
- Check box (Address is same as the parent organization unit) -
- 1. CHECK BOX TICK : For Filling address field automatically if Parent Company Address same or
- 2. CHECK BOX UN TICK: Will free all address fields for entering address which is not similar to Parent Company address.
- Address1: Enter JOBID Region Address
- Address 2: Enter JOBID Region Address
- City/Town: Enter JOBID Region City/ Town Name
- State/Province: Enter JOBID Region State Name
- Country: Enter JOBID Region Country Name
- ZIP: Enter JOBID Region ZIP
- Description: Enter Description to update any Detail related to JOBID Specification, etc.
- Save: Click "SAVE" to update the fields
- Cancel: Click "CANCEL" to cancel all fields details entered.

Note: Follow above steps for creating the entire Organization Structure where multiple COMPANY, REGION AND JOBID can be created.
Organization Structure View

NOTE: One user can link with single company, Region and Job ID, however still user need to link with Multiple Role within a Single Company, and then we have provision for Linking JOBID to multiple TITLES.
Titles: This is a unique innovation of the platform architecture that allows users to work across departments hence this is the virtual identity for the Tip Top Business suite where the entire organization operations and strategy can be planned using these titles
To create new titles for organization structure. TITLE FORM

Select TITLE Button for Tenant which we need to create TITLE's
Title Page: Below Fig.
Click on Create New Button for Creating New TITLE

TITLE Form

Form consist of following field which are all mandatory.
- Short Name: Enter TITLE Short Name
- Name: Enter TITLE Full Name
- Tenant: Show List of all Linked Tenants, Select Tenant for where TITLE need to create.
- Company: Show List of all Companies Linked with Tenant, Select Company for where TITLE need to create.
- Department: Show list of all Department (REGION) linked with company, select Department (REGION) where TITLE need to create.
- Parent: Show List of all TITLEs created within REGION, For New TITLE select "NONE" - It will make Parent TITLE for REGION.
- Link To Designation: Show List of all JOBIDs (Designations) within Department (REGION), select JOBID which need to link with TITLE.
- Status: Select "ACTIVE" to activate newly created TITLE.
- Create: Click on Create.
TITLE Page showing JOBIDs Linked with TITLEs.

Tenant Organization Structure: Roles and Permission assigned to Users
Once the Organization Structure is created, Job ID (designation) and Region (department) defined on tiptopplatform.com; Now Admin can add and assign employees against relevant Designation by using ‘Manage Business User’ tab given at tiptopplatform.com
Admin will Login with his login credentials on tiptopplatform.com

After Login, user needs to go to Business User Option and then has to select ‘Manage Business User’ tab.

In Manage Business User page: This will show the Tenant Organization Structure. And will provide the option to Add/ Edit Business users as per defined Job ID.

- Admin needs to click on Add/ Edit Business User
- By default this will display Admin user.

- To assign any user with particular Job id, Admin needs to click on Assign Button.
- On left side of the window, Organization chart will be display, Admin needs to select the designation (Job ID) in which he want to assign any user.

- Here, admin user needs to enter user ID of the user to whom he want to assign with that Job id.
Note: User ID is a unique alpha numeric code generated for each user at the time of completing registration and same is available at user top right drop down list and in tiptop mail mailbox.
This will be generated through tiptopmail.com during the invite and registering process which was already explained above in User Registration manual.
- Once admin put the User ID of user, he will click on ‘Get User’ button.

- Once clicked on Get User button the User associated with that User ID will be displayed to assign with particular job id.
- Select the job id under which admin want to assign that user from tenant organization structure at the left of screen.
- Click on ‘Next to add’ button, and the user will be added to particular designation.
- There will be one Default Designation and one will be reporting designation.
- Default designation is the designation for which employee/ user will receive the salary/ wages within the organization while reporting designation could be multiple based on his role.

- Admin need to check on both the designations available and click on save button.
- Once clicked on save button, there will be a success message and that user will be assigned with that particular designation.

- If user want to edit previously assigned user with any designation than he has to click on Edit button and the same procedure he has to follow for assigning him with another designation or region under some other job id.
User Role Management:
Tiptop Platform gives role and permission based on API Driven Methodology where all forms are protected with permission and through role wise permission are given to user.
- For assigning roles and permission, admin need to select “Role Management” option given at home page of tiptopplatform.com

- On this screen, admin will get three options as “View user without roles”, “View user with roles” and “View users with System roles”.
- Admin needs to click on “View User without Role” button, to assign roles to particular user/designation.

- Now user will select the user to whom he want to assign roles from the given user list. And then he will click on “Assign Role” button.

- Here, all the available roles will be displayed in drop down menu along with user name.
- Now, admin has to select the role he want to assign to that particular user/ Designation from the drop down menu and then he has to click on “Add” button one by one.

- Once roles have been assigned to user, form will notify that “role successfully attached with this user”.
To Remove Role with User:
- To remove any role from particular user, admin needs to select “View User with Role” option.
- This will display the list of all users to whom already roles have been assigned.

- Admin will click on “View” button to view the assigned roles with particular user.
- This will give the list of all assigned roles to that user, and click on “DELETE” button which role has to be removed with this user.

- Once clicked on “DELETE” button user will receive a notification for removal and once user click on OK that particular Role will be removed from the User.
How to Use HCM
TT HRM provides a comprehensive solution in documenting, processing and monitoring company Human Resource.
The TIP TOP Human Resources (HRM) Document provides you entire software features and functions including functionality pertaining to: Talent acquisition, Personnel Management, Payroll, Benefits, Workforce Management, Training Management, Employee Self-Service
HRM caters following business solutions for managing and monitoring human resource:
1. HAM - Human Administration Management
2. Employee Level and Grade Assignment
3. Employee Resource Assignment
4. Employee Leave Group
5. Employee Roaster and Attendance Management
6. Payroll
7. Training
Employee on Boarding:
Once Organization chart is prepared, Region and Job ID’s defined and roles/ Permissions also assigned to Designations using tiptopplatform.com, now users/ employees have to be linked with the organization and their respective designation within the company. On Boarding process of an employee will take place from now onwards. Here, we have provided “Single click ON Boarding” method which is our solutions unique feature.
- HR/ Admin needs to invite users using tiptopmail.com has already been explained earlier, invited user has to fill his own profile from My profile page on tiptoppleple.com
- Once he has completed his profile pages (need to fill all mandatory), user can be linked with organization with defined Designation using tiptopmanager.com
Admin has to Login at tiptopmanager.com with his credentials.

- Once he logged in into tiptopmanager.com, on the dash board all the unapproved list of employees will be displayed there.
- Unapproved Employees are the users whom admin has already assigned a designation, Department using tiptopplatform.com

Approve: By clicking on Approve option, admin can approve any user as employee in that organization. Once user is approved his/ Her on Boarding process gets completed in Single click only.

- On approval level: User’s Personal information such as his/ her Address and other personal information will be displayed and admin can Edit any information from here itself if found wrong.
- Once clicked on Approve button employee get On Boarded into the Organization.
Employee Level and Grade
- Once employee is approved within the company. Now admin will define its level and grade by using View Company option and inside Department Information page.
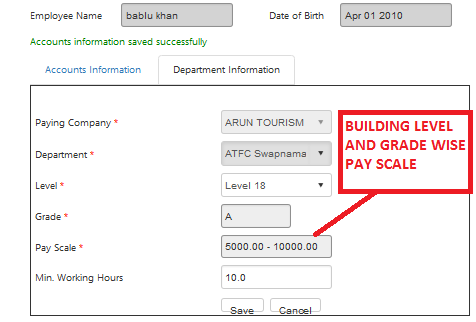
- Here, Admin/ HR will enter and set particular employees Level from the drop down menu. And will also enter Minimum working hours.
- Once Department information is updated, HR or account department will fill employee’s Bank account information for salary disbursement purpose.

Company Master:
Company or companies created from TipTopPlatform.com, they show in company master form. Admin can edit the particular company and define rule and policy based on business nature.

- To edit or to update any company, admin will click on Edit link given in front of company name.
- This will open the company master form in editable format.
- Here, admin can need to enter company’s master details like company address, contact details, Week Of, working hours, Number of holidays, number of breaks in a day, break interval time, etc.

Designation Master:
From this from admin can Edit and Update employee designation however new designation can only be created in organization structure in TipTopPlatform.com

- Department name, Company, Reporting Designation will be displayed in this form; admin can edit or update the designation from here by click on respective designation edit option.

- Admin can edit only Reporting designation name and working hours here including right to mark him as super user.
Location Master:
This form is used to define department location within the company as well as for duty location of any employee or asset location.

- Here, admin will give a specific name to any location in Name field.
- If that location exists under any other particular parent location than from parent option that location will be selected. (If the location is inserted for first time than admin will not select the parent location and leave that blank)
- Category to select: Category of that location need to select from this like Indoor or Outdoor.
- Department to select: which department belongs to that particular location in company?

- Latitude and longitude will be entered for that particular location and finally admin will select the Active status to make that location available inside the location library and will click on Insert button to save this new location record.
Location Category:
This form is used to define categories of any location like Indoor or Outdoor.

- Admin will enter the category name using Name text box.
- Admin will write the description about that location and finally select the status as ‘Active’ and click on Insert button. This new added category will be available now in Location Master Form to register any location within the company.
Attendance Status:
Admin can create and name attendance status based on Attendance Type (Meta Data). Company Admin can Name any Attendance Type based on Company Attendance System (Policy)

- Here, in this form admin has to define Attendance policies of company. Like Attendance type, working hours, Half day working hours, absent working hours, etc.
- This form is used in marking employees’ attendance and from the same form admin will define the irregularity and Shift policies within the company.

- Attendance type can be selected from the drop down menu item as Absent, Absent on working day, Holiday, Justified, Leave or Leave with pay etc.
Irregularity Status:
It is rule setup form helps in managing discipline of company by checking employee irregularity. It helps in naming irregularity based on Irregularity status (Meta Data)

- Using this from admin can set policies for Irregularity in attendance status.
- First admin need to select the company from drop down for which he want to set policy.
- Select Irregularity Type from drop down menu as Indiscipline, Justified or not justified etc.
- Check the Paid or Restricted option on irregularity.
- Define working hours, absent hours, Half hours and early absent hours.
- Click on save button to save the form data regarding Irregularity status as defined by admin.
Leave Type:
Admin can create and Name leave from Attendance Status marked under leave.
This form will be used to setup leave type and to make that active too in leave group.

- Admin will select the company and leave type from the drop down menu.
- Based on selected leave type its display name will come automatically inside the provided text box.
- Description can be written at given text box regarding that leave type.
- Now admin will check weather this leave type is Holiday, Paid or restricted by marking check on desired check box.
- If that leave type is paid than admin will define the paid percentage here. And by clicking on Active check box, admin will click on Save button to save that leave type.
Leave Group:
Admin can create and Name leave group with combination of Attendance Status and these leave group will be linked to employee based on company rule.

- Admin will select the company name from drop down menu and attendance type and leave type will be displayed on this form.
- Now admin will select the option of defining leaves like day wise, week wise, monthly or yearly basis from the drop down menu.

- Once option of leave defining is selected now admin will enter the number of working days, Number of leave, work hours, half hours, absent hours, early half hours, and early absent hours in that particular time frame.
- Than he will enter the description about that template of leave group.
- Admin will check the weekly off days as available on the form.
- After entering all above information, he will put the date of effectiveness of that leave group policy and make this active and will click on save button to save this lave group details.
Leave Shift:
Create and Name Single default Shift for Particular Leave Group which will automatically allotted to employee when leave group is attached.

- Using this form admin can create default shift under particular leave group.
- First admin will select the company from drop down menu for which he want to create lave shift. And then admin will select the particular leave group from drop down under which he is creating leave shift.
- Shift date range he will select from the option given and then he will click on Submit button to save this record.
Leave Group Holiday:
Here, admin will define Holidays in Particular Leave Group and Defining Holiday Date.

- Once leave group defined, admin need to give specific date to particular holiday name.
- Holiday list will be displayed in the grid and in valid from and valid to text boxes, admin will enter the date for particular calendar year on which that holiday falls.
- Click on Save Holiday button to save this record.
Leave Group Payroll Rule:
Here, admin can define Company Payroll Rule in Each Attendance Status linked with particular leave group. PTO (Paid Time Off) functionality is available.
- Select the company name for which payroll rule want to set.
- This will provide a form to define or to modify particular payroll rule.

- Attendance status and name of leave/ attendance will be displayed on that form.
- Admin click on Modify Rule button to modify any defined rule.

- Here, admin can set rules to adjust any leave/attendance against earned or balance leaves.
- Select the name of leave from the grid and select the period from option drop down menu.
- Admin will enter the number of working days to earn leaves. Like in how many workings days how many leaves will be credited depending upon the particular defined working period.
- Admin will check ‘Is Paid’ or ‘Is earned’ check box as applicable.
Leave Opening Balance:
Using this form, Employee Leave Balance can be added, based on new transition.

- To enter Leve opening balance, first admin need to select the company, Department, employee name and leave type from the drop down menu.
- Leave type could be sick leave, casual leave or weekly off etc.
- From date menu select the date till when leave balance needs to update.
- Enter the leave balance in figure and click on save option provided in this form.
Approve Holiday:
Given Function to Unlimited Approval Level to Org. Hierarchy for Approving Holiday.

- All the listed holidays will be displayed here, and admin can approve holidays as listed in this form as per company selection.
Payroll Rule Master:
Create Payroll Rule based on Company Policy.

- Here, admin first select the company and attendance status from the drop down menu item
- In attendance status this will display the type of attendance and list of holidays too.
- Admin will select the respective attendance type and then will enter the number of leaves, credit leave balance, debit leave balance and status of that attendance/ leave that is it paid or not.

- Click on SAVE button to save this payroll rule.
Shift Master:
This form is for defining Shifts. Admin will setup employee shift with breaks.

- On this form, Company can define its working shifts/ hours.
- Fist need to select the company name from drop down menu. Then admin will select Leave group and attendance type from drop down menu.
- In Shift Time, admin will enter the working hours, In time, out time and number of breaks he wish to allow.
- IN Break section, need to enter out time and in time during the break.
- Here, admin can also enter Lunch or Dinner shifts in time and out time wise.
- Also here check the week day for week off holiday here too.
- IN others section: Admin can define the rule of marking Absent or Half day depending upon the hours any employee worked in a defined shift. For Half day admin can define that minimum how many hours needed to consider his attendance in half day and how many hours needed for absent status consideration.
- Click on SAVE or Update button to save this record as shift status.
Employee Shift Assignment:
Here, admin will define particular employees working shift.

- Admin will select company first in which that employee resides.
- Once company is selected, respective department will be displayed in department drop down and admin will select the department than he will select particular employee from the list whose shift admin want to assign.
- Admin will select the period for which he is willing to assign shift for.
- Finally admin will click on Submit button to open the page from where he can set and assign employee shift.

Shift Irregularity:
This is disciplinary monitoring form where all Employee Attendance Irregularity will display and admin can view, edit and correct the attendance status. Employee shift is already assigned to all employees within the organization and if employee check-in/ checkout out of that sift than it will be displayed in this form and admin will approve or mark irregular status against that particular irregular employee.

- On this form first admin will select the company in which he wants to correct/ edit irregularity.
- Than admin will select the department within that company and then will select the employee from drop down or direct by selecting department, it will display the list of irregular employees within selected date range only (date range will also been selected by the admin)

- On this form irregular employees list will be displayed with their marked attendance. Allocated In time and Out time also be displayed in that from, and employees actual marked in time and out time record will be shown here, including employees break time, shift break time, allowed shits etc.
- Admin or supervisor will check the status and verify the same with employee regarding his/ her irregularity and he can update the status accordingly as Justified, not justified, Half day, leave, emergency leave, on duty, in discipline etc.


- We have given an option to select the date for which irregularity needs to be corrected and option is there where if employee has not marked his/ her attendance than once verified by the supervisor he can mark his/ her in time and out time manually in the space provided o this form.
- Once supervisor inserts the required remarks and status in irregularity form with respect to irregular employee, he will click on Update button and this record will be saved.
Leave Application:
Using this particular form supervisor or reporting authority can apply for leave on behalf of under supervision employee. On this form employees’ leave balance will also be displayed.

- Supervisor/ admin will select the name of company first under which that employee designated.
- Select the name of employee from the drop down menu item. And employee code will be displayed on this form below employee name.
- Than admin will select the Leave type, leave date range, number of days from the provided menus.
- Admin will enter the reason for leave along with address while employee will be on leave.
- Now admin will click on Submit button to save and to send this leave application to next level for approval.
Leave Application Status:
Here, admin can see the approved or rejected leave status of applied leaves. Employee name, employee ID, applied leave date; reason will be displayed there including its current status.
Approve Leave Status:
Using this form the admin or the designation that is authorized to approve any employees’ leaves can approve or reject leaves as applied.
- On this form admin can search the pending application, approved application and discarded application as well.
- Form will display the available and applied leaves with employee leave details as he filled during leave application as name of employee, department, leave type, date and reason for leave.

- Admin will click on Approve link to approve particular leave application or he can click on discard link to dis approve as well.
Approve Earned Leave:
This form is used for generating process to calculate the leave credit and debit in specified time interval based on allowed leave policies like setoff rules leave groups, etc. Whatever the leaves any employee has earned, admin will manually approved from this form, only approved leaves will be shown and available to that employee during his payroll generation.

- Select the company name from the drop down menu and select the employee name from respective company.
- Enter the date from and to, for which time interval earned leaves to be approved.
- Click o Load Data form to load the leave balance employee earned in that particular time interval.

- On this form day wise leave credit will be displayed as per the payroll rule defined earlier.
- Leave type and Credited/ earned leaved day wise will be displayed here.
- Admin can approved those earned leaved from Approved section. He can adjust those earned leaves too.
- Put the remarks if any based on approval.
- There is an option to approve multiple credited leaves at once, select the checkbox at once which leaves have to be approved and click on Run Payroll rule button given at the top.
- By this way leaves will be credited and approved against that employee in particular time interval.
Employee Grade:
Using this form admin can create and Define Employee Grade based on company Policy and based on his salary scale.

- For adding employee grade as per company policy, first admin will select the company from drop down meu item.
- Name: In Name field admin will enter the name of grade.
- Admin will enter the Minimum and maximum range of salary scale based on grade.
- Click on Active button and SAVE the record to activate Employee Grade.
Employee Level:
Using this form admin will create and define Employee Level Based on Company Policy.

- For defining employee level first admin will select the company name from drop down menu.
- Admin will enter the name of Level and will select the appropriate rank as per the menu given (i.e. A, B, C….)
- Check on active button and save this record to save the employee level as per company policy
Salary Head:
Admin can create and define Salary Head based on Company Policy using this form.

- On this form admin will select the company name first from the drop down menu item.
- Enter the short code for the particular salary head and enter the name of salary head as Basic salary, Monthly incentive, HRA, Medical allowance, daily wages etc.
- In attendance based option, admin need to select that that particular salary head is dependent on employee attendance or not.
- If hat particular salary head is payable on daily basis than admin have to select Yes otherwise will select No option from drop down menu.
- Admin will check on active button and will save the record.
Leave Group Set Off Rule:
Set Off Rule in Payroll Process on Leave Group.
- To fix the rule on setoff policies, go to leave group
- Click on Setoff Rule button.
- On this form Attendance Status will be displayed in grid, admin will check the attendance status against which that particular leave needs to be setoff.

- Admin enter the priority based on policy and click on update button to save this record.
Overtime Group:
Create and Store Overtime Group.
This form is protected by password to provide security of access on payroll data. This form is used to define overtime payment policies within the company based on salary percentage as well as on the basis of hourly wages.
- First admin will select the company name from drop down for which overtime rate has to be defined.
- Enter the name of Overtime policy like hourly rate basis etc.
- Check the payment option as ‘Salary Percentage’ or ‘Wages percentage’
- In round off text box enter the amount to round off the figure.

- Inside slab section, admin will enter the name of slab based on hours, enter the minimum and maximum allowed rate for over time and enter the percentage of total salary or wages.
- Click on Active check box and click on update button to save this overtime slab.
Payroll Formula:
Create and Store Payroll Formula

- Here, admin have to create/ write the calculation formula payroll calculation.
- First the payroll calculation formula admin need to give a specific name and description to that.
- Admin will select the company name from drop down menu.
- Factor operator and factor for salary calculation also given there in drop down menu as days in month basis, days in year or custom method of calculation basis.
- Finally admin will check on active button and will submit the form data.
Approve Overtime:
Using this form admin will approve and update overtime for respective employee, if that employee is allowed to take benefit of over time.

- Admin first have to select date range in which employee is allowed or worked over time (beyond his/ her shift)
- Admin will select the company from drop down in which particular employee resides.
- From Name drop down menu item, admin will select the name of employee to who over time has to be approved.
Employee Attendance Right:
From this option admin will defined the attendance punching rights and permission company want to allow for. We have provided right/permission as card punch, manual punch, bio metric, NFC tag method, Mobile Device Mac address method etc. For employee authentication and his validation we have given attendance rights in combinations as well. So this will provide multiple level of authentication for punching attendance.

- For employee attendance right, first admin will select the Company name from the drop down in which that particular employee works.
- Than admin will select the Department from drop down menu under which that employee works and finally he will select the particular employee from the list of employees.

- Once admin selects the employee for giving him attendance rights.
- In Authentication option we have provided all possible and available methods of authentication. Admin will select the method from drop down he wish you give to selected employee.
- And finally admin will update the record and that particular attendance right will be assigned to that employee.
- If there is some next level approval need to change or to grant the permission then attendance approval page will be open and next level of approval will be opened.
Approve Employee Attendance Right:
Using this form approver will allow/ approve the attendance right to particular employee which was allowed and granted by the supervisor on previous page.
- Approver will open the page for ‘Approve Attendance Rights’
- Here, approver will get the name of employee whose rights of attendance he needs to approve.

- Approver will click on Approve link and the respective page containing rights of attendance will be displayed.

- Now, Approver will click on Approve Data button than this will be approved from his end and employee will be able to punch his/ her attendance using that assigned method.
- On the same page there will be an option to discard the request as well.
Process Salary Database:
Using this page, admin/ HR can process salary based on company own database. User can directly attached database of payroll and process payroll giving secrecy of payroll figures

- Select the month first for which salary has to be processed.
- Select the name of company from the drop down.
- IN Employee section, this will display the name of employees’ under that selected company; admin will check the name of employee to process that month’s salary for.
- Click on ‘Process Salary’ button.
- Once clicked on Process Salary button, it will process the salary of that particular employee and will display the records including total working days, half days, absents, net salary, deductions, leaves, fixed pay, variable pay, overtime amount and net salary amount.
Process Salary:
Using this form employees’ month salary/ payroll will be processed and Pay slip generates.

- Select the start date and end date in which salary has to be processed.
- Select the company name from drop down menu.
- Employee list will be displayed here based on the selected company name.
- Select the name of employee whose salary has to be processed.

- Click on Process Data button to start processing the salary calculation.

- On this form employees’ complete salary details will be displayed.
- Leave balance, earned leaves quantity, Set off, Calculation formula, and salary figure will be displayed here.
- Admin/ Payroll admin can adjust any leave if earned with any absent days. If leave is adjusted with eared/ balance lave than it will show the calculation effect in final salary processing.
- Payroll admin click on Set off button to set off any available credit against any absent.

- Finally after making all adjustments, click on ‘Finalize Data’ button to generate the salary and to generate the pay slip.
- Click on Print button to generate the Pay slip report.
Salary Payment:
This is a reporting tool basically, where list of employees could be generated to view the pending or paid salaries to respective employees.

- Select the company from drop down menu and choose the salary type as Paid or pending.
- This will display the list of employees in respective company.
- Select the name of employee and click on ‘Load Data’ button.
- This will generate the list of that employees salary details in a particular month or time frame where his/ her salary processed.
Handover:
This form is used to transfer of department charge (Handover & Takeover of department charge) Form define important information for both successor and predecessor.

- For employee motivation at the time of handover, person who is transferring his duty to takeover employee, there is an option to select the memorable story from the drop down which is already saved on Guide page.
- Once the department is selected, a tag will populate on the screen which will display the current status of hand over and take over within that department. It will show that particular department’s handover is with which employee and who is going to take over that along with the date and time to transfer the handover/ takeover activity.
- Select the name of employee who is going to take over the charge now from (responsible employee name will automatically be displayed there in drop down menu)
- Now, both the handover and take over employees needs to enter their passwords there and click on Submit button to finish the handover/ takeover process.
Pending Complaints/ Pending Tasks:

- During the time of Handover/ take over this form will display the pending complaints related to that department, so that take over employee will come to know the exact status of complaints pending at that time which needs to be addressed.
- Searching/Sorting option is available on that form to sort the pending tasks, upcoming tasks, current or not yet generated tasks, active or passive tasks etc.
- This Form will also show the task start date, end date, due date, responsible employee name, approver or owner etc.
Insert/ Update Attendance Entries:
- Using this option authorized person can insert or update its department’s employees grooming and ranking too. Attendance can also be updated using this form option if employee within that department has not marked their own attendance.
Employee Grooming:
Employee grooming form is basically an employee monitoring tool having many functionality like checking and rating grooming, check task and delegate task, change roaster, update defect or appreciation etc. (At Time Of Reporting In)

- This form will be filled by supervisor or manager of particular employee who is authorized for doing this.
- First on this form supervisor will select the company name from the drop down and then he will select the department within that company. Once selecting this it will display the list of associated employees list in grid.
Training Schedule Setup:
Using this form admin or supervisor can schedule and create training for the employees or for the employees who are under his/ her supervision.

- Initially admin/ supervisor will select the Category of Training like Task or Initiative from the drop down menu.
- Admin will select the company name from the drop down and then will select the department and location where training has to be offered or to be scheduled.
- Based on Task or Initiative, respective Jobs will be displayed in drop down menu and here admin will select the Job from there. And then admin will select the name of Trainer from the drop down list.
- Admin will select the ROLE of Trainer whose name he selected as a trainer from the drop down menu.
- After selecting Agenda from the drop down menu, now admin will define the start date and end date of that training.
- If the training schedule or training material is available than admin can give its URL here at provided text box., also admin can input the duration of this training and then he can select the session in which training has to be scheduled.
- Finally admin will click on Insert button and this record will be saved and training schedule setup will be completed.
- Once training Schedule is setup, it will be displayed on the same home screen.
- Click on Add Trainee option to add the trainee in that defined training schedule.
- Check on ‘List All’ check box item, and select the name of employee from the drop down menu who is going to take this training.

- Click on right button to activate the selected employee as Trainee.
Training Certification:
Once the training schedule is setup and trainees added into that, training will take place and training certification process will initiate.
- Scheduled training will be displayed in this form along with all mentioned details about.

- Click on edit option given at the front of this record.
- Here, on this form trainer will enter the remarks, training date, training outcome, recommendation, certification date etc.

- Training outcome will be entered as Unsatisfactory, Needs improvement, Excellent or Outstanding etc.

- Trainer can enter recommendation and comments too.

- Click on right button to save this record.
- If training status is completed than, its approval will be done and employee will be awarded as certified employee.
Approve Training:
Once employees training certification is completed from trainer side now this will be approved.
- On Approve training page details of training certification will be displayed for respective employee.
- If admin or Training approver want to edit any status than click on Edit button to alter the details.

- Select the name of employee to approve for the certification from the list of employees.
- Click on Accept Selected and this will give a success message as “Training Certification has been approved”.
How to Use HUMS
The HRMS is a complete suite that offers all the features required for creating and managing an efficient workforce but, the competitive world has a bigger challenge.
“To move the organizations from efficiency to effectiveness”
So that right people do the right thing not just people doing the right thing and this Gap is filled by Tip Top HUMS systems.
“To move the organizations from efficiency to effectiveness”
Performance Tool in terms of knowledge score, activity score and communication score directly linked to Promotions, Increments and Incentives.
MBO (Management By Objective) scores directly points to employee planning and execution capabilities.
The module has complete Performance appraisal suit.?
Appraisal Master:
Using this form admin can create and update Appraisal Library.

- Admin or HR will select the name of company and department under which particular employee reside whose appraisal needs to be opened.
- Once company and department selected, admin will select the employee name and click on Next button and this will open the form for creating his/ her appraisal.

- In appraisal detail form, particular employee name and his associated designations and titles will be displayed as already linked with.
- Admin will enter the relationship of employee with Reviewer and select the review period from and till date. (Review period from date will be the joining date of employee or the date from last time reviewed)
- Date of appraisal details filling date will be displayed automatically and this will take current date.
- Department will also be displayed on this form.
- Reviewing manager name will be displayed in drop down menu and admin will select the name from the drown menu.
- Review type needs to be selected from drop down like annual, developmental, interim reviews, probationary etc.

- Admin will also define appraisal expiry date and review date too. And click on Next button to redirect on next page of appraisal setup.
- On next page (Template Setup page) admin will get an option of setting up appraisal template. Pre-defined Templates will be displayed here (templates will be defined using control panel by the admin) and admin can select any pre-defined templets from the drop down menu.
- Once any template is selected from drop down menu, it will display the format to setup the template as per appraisal admin desire.
- Appraisal template groups will be displayed there along with key appraisal content like Discipline, communication, Achievements, defects, problems, team work, integrity, etc. In respective key contents admin will see the parameters as well with respect to key appraisal group names.

- In respective key appraisal contents, template will show start date, end date, defined Baseline, set targeted value, Maximum measure points etc.
- Admin can enter the weightage here based on organization policy or based on appraisal policies.
- After setting up weightage, appraisal admin will click on update and load template button given at the top of this page. And that template setup will be saved for appraisal for that particular employee.

- Click on Job Specification button to see the job description of that employee.
- Click on ‘Activity and discussion’ button if appraisal admin want to discuss anything related to appraisal with employee or respective supervisor etc.
- Once clicked on ‘Activity and discussion’ button it will open message form to send any message regarding appraisal.

- Click on ‘Daily Activity’ button to see the daily grooming report of employee submitted on regular basis.
- ‘Generate Polling Form’ button will generate the polling form to poll on defined parameters based on employees JD etc.
- Click on ‘Cover Letter’ button to generate the cover letter regarding employees’ appraisal generation.

- Click on ‘KPI Score’ button and this will generate crore card in graphical format based on KPI’s.

- Click on ‘KPI’ button, this will display the KPI score based on per-defined KPI’s. Achieved and maximum scope will be shown on this form.

- Appraisal admin can edit this generated score by clicking on Edit button given at this form.
- Click on ‘Improvements required’ button, this will generate the form where the areas will be shown based on KPI’s where employee needs improvements based on KPI Score. Achieved score, maximum score, base line will be displayed here too.
- Click on ‘Your Achievements’ button, this will display the KPI’s where employee has secured maximum score.
- Click on ‘Essay Evaluation’ button, this will generate a Questionnaire to be answered by the employee regarding his working in the organization. It’s a kind of feedback form for employee.
- Click on ‘Goals’ button, this will generate a form where employee can give his remarks/ career goals etc.
- Click on ‘Outcome’ button and this will generate the complete report regarding employee appraisal like KPI Score, MoB Score, MoB’s, Achievements etc.
Appraisal Method Setup:
Using this form admin can create and store Appraisal Methods library.

- All available methods of appraisal libraries will be displayed on this form and admin will check the desired library method he wants to apply on appraisal form setup.
- Admin will check and click on save button to set this library.
Appraisal Group:
Using this form appraisal admin will create and store appraisal group which will be displayed on appraisal template setup form.

- Admin will enter the name of appraisal group in first text box and will enter the description of that group name.
- If admin want to give any tool tip notification than its description he will enter here in Tool Tip text box.
- Now, admin will select the Parent group name under which that new created group will fall into from the drop down menu.
- Admin will define the display sequence of that newly created appraisal group.
- If admin want to set negative value also than he will check that and mark status as Active and finally will click on Save button to save the newly created appraisal group details.
Appraisal Questions:
Using this form admin can create and store Appraisal Questions Library which can be automatically called in appraisal form.

- Here, admin will enter the Question in given text box.
- Sequence of question and status will be selected as active and will click on save button to save this question. Saved question will be available in Appraisal form.
Appraisal Template:
This form will be used for setting up and to store Appraisal Template based on group of Employee Level.

- Enter the Appraisal Template Form name.
- Enter the description in the given text box and enter the total marks for this appraisal template.
- Enter the expiry date of this template and make it Active by selecting from the drop down menu.
- On the same for all available KPI will be displayed at left side of form and admin need to select the KPI’s for this particular appraisal template to make that active.
- Click on ‘Save Template’ button to save this new appraisal template.
How to Use Training Module
Training Module Utilities
- Training open automatically once user linked with organization.
- As user complete his certification real time score is added in training KPI
- Next role training open automatically based for succession planning.
- 360° Feedback Training Performance Tracking.
- Training History maintenance and analytic & dashboards to monitor training effectiveness.
How It Benefits Your Organization
- Track training status and impact through real-time web-based reports.
- Analyze competency gaps & create targeted employee training programs to address them.
- Determine training effectiveness and ROI by tracking improved performance of competencies.
- Centralized tracking Track learning activities within one cloud-based learning management solution by monitoring through user workSpace.
- Email Reminders.
'Employee’s Training Work Flow and Procedures:

Individual’s Training Page:
Once an employee is attached to the Job Description we require a mechanism where his uncertified jobs are automatically linked to training requirement modules.
- Open ‘My Guide’ for every Individual to read and remark.

Note: It show only to Employee holding designation with Activity Title Linked
- On my guide page Training material will be displayed based on the designation/ title and job description for particular employee lined for.
- Employee will read the documentation there, provided guide for overview of that job, how to do, what to do, desired result and achievable.
- Employee/ trainee will read that and will provide his/ her remarks as ‘I have Understood’, ‘Not Understood’ or ‘Incomplete Data’.

Training Schedule Setup:
Using this form admin or supervisor can schedule and create training for the employees or for the employees who are under his/ her supervision.

- Initially admin/ supervisor will select the Category of Training like Task or Initiative from the drop down menu.
- Admin will select the company name from the drop down and then will select the department and location where training has to be offered or to be scheduled.
- Based on Task or Initiative, respective Jobs will be displayed in drop down menu and here admin will select the Job from there. And then admin will select the name of Trainer from the drop down list.
- Admin will select the ROLE of Trainer whose name he selected as a trainer from the drop down menu.
- After selecting Agenda from the drop down menu, now admin will define the start date and end date of that training.
- If the training schedule or training material is available than admin can give its URL here at provided text box., also admin can input the duration of this training and then he can select the session in which training has to be scheduled.
- Finally admin will click on Insert button and this record will be saved and training schedule setup will be completed.
- Once training Schedule is setup, it will be displayed on the same home screen.
- Click on Add Trainee option to add the trainee in that defined training schedule.
- Check on ‘List All’ check box item, and select the name of employee from the drop down menu who is going to take this training.

- Click on right button to activate the selected employee as Trainee.
Training Certification:
Once the training schedule is setup and trainees added into that, training will take place and training certification process will initiate.
- Scheduled training will be displayed in this form along with all mentioned details about.

- Click on edit option given at the front of this record.
- Here, on this form trainer will enter the remarks, training date, training outcome, recommendation, certification date etc.

- Training outcome will be entered as Unsatisfactory, Needs improvement, Excellent or Outstanding etc.

- Trainer can enter recommendation and comments too.

- Click on right button to save this record.
- If training status is completed than, its approval will be done and employee will be awarded as certified employee.
Approve Training:
Once employees training certification is completed from trainer side now this will be approved.
- On Approve training page details of training certification will be displayed for respective employee.
- If admin or Training approver want to edit any status than click on Edit button to alter the details.

- Select the name of employee to approve for the certification from the list of employees.
- Click on Accept Selected and this will give a success message as “Training Certification has been approved”.
How to Use TipTop Mail
Tip Top Mail User Document
Tip Top Mail is a dynamic business email solution that is for small and big businesses & enterprise organizations. It is a cloud-based architecture and let your data managed by you giving 100 % data privacy and security. At TT Mail we have created a ZERO INBOX with Artificial Intelligence supported Object based communication that
- Threads all the conversation based on object and
- Groups the conversations based on subjects
Within this object allowing you to get all your messages in one place and extends collaboration with all the participants that’s why TT Mail is a complete industrial collaboration and communication tool.
Once user logged in, very first he sees the homepage of tiptop people where he can switch to the other options like-
- Work space
- Calendar
- My Profile
- Contacts
- Bulletin
- IOT
Tiptop Mail is a Strategic based Object Oriented Messenger which allows the user to use a Mailing Tool within the Organization for both the Company as well as Personal use
Tiptop mail is divided into three parts called “PANE”.
First pane refers verticals having two groups
1) Tenant Group
2) Personal Group.
Second pane refers grid having grid messages listed with object name.
Third pane refers message containing area shows the description of messages.

Let’s discuss these three panes in detail...
FIRST PANE-
As specified earlier, user can manage two ID's in Tiptop Mail. The first one is considered to be Company’s ID while the later one would be his Personal ID.
The below image clearly the Two Id's a User can maintain.

Upon expanding these Tabs, the User would get the following sub-tabs as explained in the Image below-

SECOND PANE-
Compose Emails- The User can start sending E-mails by composing them by clicking on the Compose Button. Please refer to the image below

As soon as the User clicks on the Compose Button, it takes him to a new screen from where user can compose a new message, as shown below-

Here, in compose mail we have the following sections-
Object name- Object name just like parent subject where you can create no. of child subject. In simple words, object name could not be changed while subject can; also we can have number of conversations in same object.
Also when you forward or add new conversation in the same message then object (parent) subject will remain the same.

Subject - Subject is child of object that can be changed during forwarding any mail or message or adding new conversation, it cannot be changed while we reply on any message or mail.


Sender- Sender is the user who sends the message as shows in from option.

Here in this from, if user controls on Tenant folder then he can see his tenant features like Designation, mails and etc.


To see personal folder details user needs to click on Personal folder.

TO - To refer for recipient to whom sender is intended to send message, recipient could be one or multiple depending upon the sender to how many persons he wish to add. For this we have to click on "To" button where user can see the "Add contact form."
In add contact form we have options as Add Group, Add External Contacts, Add Tip Top Contacts and Display Contact List.

ADD GROUP- In Add group only “super user” is having the permission to access and to modify. Normal business user cannot access it.

**ADD EXTERNAL CONTACT – If user wish to add contacts belong to outside the group than he can use add external form where user needs to fill specific person’s information (To whom he wants to add) like Contact username, Email address, First name, Last name, DOB and phone no. These all information are mandatory (Primary information) in the form.

However if user wish to add some more details about the person like father name, marital status etc then he can fill all these in secondary information section.

In add external contact form we have three more buttons used for different purposes, they are
1) Add New Group
2) Add New Category.
3) Add Company

Above 1 and 2 options button used to create a Group and Category in the organization. For e.g. user could use Group option to open Developer Group, Tester Group and etc and Categories like Dot net developer category, Java developer category and so on.
Add Company – If organization wants to track the organizations responsible person’s visit details for the particular company than he can track this by using this Add Company from where organization person will make an entry about the schedule he managed like Company code, Company name, date, Address, phone no, emails and etc.

ADD TIPTOP CONTACT- As we have tiptop contact’s person database, so we can search those user’s name and can add them.

Now, by check on the checkbox and click on submit button desired contact person will be added; also you can clear the search result by click on "RESET BUTTON."

DISPLAY CONTACT LIST- In display contact list user can see all the added contacts and simultaneously delete those records if not required.

If user wish to delete any particular record then he can search by enter input and delete it.

Priority- According to message importance user can set the priority of the message by setting priorities as HIGH (RED COLOUR), MEDIUM (YELLOW COLOUR), NORMAL (BLUE COLOUR) and LOW (GREEN COLOUR).

Inbox- Inbox having total counts of unread and read messages, but in case of Tiptop mail’s uniqueness it shows the no. of unread mails in vertical but if all messages get read then the total counts do show as per priority marked.

Grid Messages-Grid area usually shows the object of the messages, we can mark follow up, and priority, read & unread messages by right click also. These functionalities user can mark from header by checking the checkbox of the grid messages.
Read / Unread messages- As said read and unread messages are classified in two ways
1) By right click
Kindly note message show bold font means unread and normal fond read.

So we can mark read and unread by right click on grid message as shown in the below figure.

2) By marking it from header.
User can check the checkbox of the grid messages and click on header button to mark as read or unread.

Follow up-
1) By Right click- User can add follow up status, by right click on grid message then hover on, on follow up and click on add button.

2) By marking it from header
Check on checkbox of grid messages and click on follow up button for setting it.

3) Priority set by right click- User can right click on grid messages then hover on priority and can set any of priority like high, medium, normal or low.

Control of the messages-
Blue color at background of Grid messages, specifies the control of the messages on which particular mail user are upon.

Also you can check the details of particular message by click on expand button.
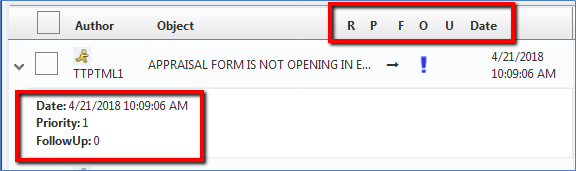
By clicking on expand button you can check date, time, priority and follow up.
Priority "0" means low priority while 1, 2, and 3 refers normal, medium and high respectively. Also follow up "0" means follow up not set in grid message and "1" refers set.
R- Refers Read message
P-Refers Priority marked in message.
F-Refers follow up marked in message.
O-Refers Order by we can sort messages according to order by too.
U- Refers unread message.
Date-By click on date, it shows the oldest message first.
These buttons also used by sorting, by click on these buttons user can sort any of the refer category messages for e.g. If user wants to arrange the unread messages, he needs to clicks on unread button and all unread messages will be shown first on grid.

Note- User can also sort these messages by sort it in ascending and descending order as well.
Header buttons option- We already discussed about composing mail option, follow up, read and unread buttons, now let’s discuss the remaining buttons like Complete, communication and effective score etc.
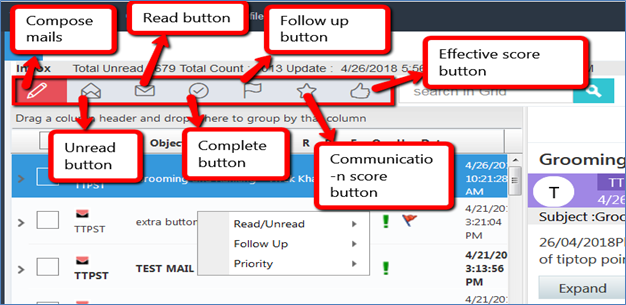
Complete button- Use of this button is to complete the messages (if it is no longer use), user can check the checkbox and click on complete button then the message gets completed.
We can also complete the message by using third pane (message containing area)
*will discuss in third pane

Communication score- Communication score represents the efficiency and effectiveness of user who is using mailing solution. It is based on the SEND AND REPLY parameters of mails. This score depends upon the replies any user gets for its own sent messages and how many responses he sent /replied from his own dashboard/ mail box. This communication score improves the effectiveness of user and also displays the working performance as well.
This is really very unique feature of tiptop mail that forces the user to read every single message and accordingly complete it (if message is no longer use). This feature also justifies the "Zero communication inbox" feature like any other mailing tool does not have so far!
Every user has its own communication score according to reply and responses he gets and receives from other users.

In above screenshot popup window, communication score is showing 26.18 of the user
Effective score- Effective score

In above screenshot popup window, effective score is showing 99.99 of the user
Kindly note different sections like completed, deleted and closed etc. have different header option.

Search button-
Search button is used to search a particular message from the records; user can search any message from any of the vertical options like inbox, draft, completed and etc.

THIRD PANE-
Third pane called “message containing area” where the description of object messages also shows.
Message containing area shows OBJECT, SUBJECT, DROPDOWN OPTION and Header buttons.

Header buttons-
Print button - Used to print the document.
Add new conversation- New conversation means the previous trail of the message will not exist and new thread will keep continue, here user can change the subject but only object (parent) will remain the same.

Drop down option-
In every mail of tiptop we have a drop down options like reply, reply all, forward, close and complete.
Let discuss all of these in details one by one-
1) Reply- Every user can reply of any mail which comes to him by using this option. When user uses reply option the recipient name gets auto filled makes very simple user recipient selection.

Note : Reply is not possible from complete and delete section and if user wants to reply any of the message exists in complete and delete section, than user needs to restore it and then it goes to the particular section (where it get completed like inbox) then only user can Reply on that thread.
Reply all-
The only difference in reply and reply all is multi recipient gets auto selected (reply all) if they exist on particular message.

Close - In order to accomplish the “Zero Inbox Communication” we use close button.
Suppose, any task assigned to any user by other user through mail and If the first user feels that he has finished the task assigned into that from his end, so the user will mark this message as “close” and the message will go into close section, however this will be closed from his own mailbox but not from any other folders.
Now if assignee (user who assigned the task) thinks that particular task has not been finished yet, he will reply on particular subject message and message (was in close section of assigned user) came to inbox automatically.
Completed section-
To accomplish zero inbox communication if any task is assigned to another user and if assignee thinks particular task is finished by assigned person then he has an authority to complete his created message as task gets finished. By doing this particular message automatically goes to another (assigned user) complete folder.
Means that message does not exist in inbox.

Forward - Forward means that someone also interested to see the trail of the messages and user keeps him in loop for the conversations.
By marking on loop another user will be able to see the whole conversations of the message.

Discussion & Activity List –To use these folders first customer needs to buy application “Tiptop manager.com” from where he can create these activity and discussion.
Draft section -
Draft having those messages which may lost or not sent due to connection lost or server error, also if user write any important message and needs to leave it in-between because of any reasons then he can save it in draft by click on save as draft option given at message form.

Using of this option allows user not to write the mail again and he can edit and send this mail to the desire recipient by click on edit option.

Trash- If user does not want to use that draft message he can trash it permanently by using this option and message no longer exists in the entire mail box, it means message gets deleted permanently from the system.

Add new conversation- We can create new conversation in draft also, the object remains the same while you can change the subject, it is usable when user wants the same object line but not the message thread.

Sent -
It shows the message which has been sent already to its recipients.
Recall- In recall if user send any message to any recipient by mistake then he can get back (roll back)that message by using recall functionality, only condition applicable not even single user should read that sent messages (if it send to multiple recipient).


Also user can delete the message either by header or by right side drop down options.

Deleted- User can see all deleted messages by the user; this is the final folder where message stored (Pending until the changes get done).
Add Contacts – For add contact section kindly refer page no 8 to 13 above.
BLOGS – Blogs are the published news or information by the organization so every member in the entire organization could be notified.

User can click on read more to see the full information about the particular topic that has been published by the authorized person.

Kindly note BLOG and BULLETIN having same content.
CALENDAR
Calendar is used to organize the organizations schedules, meetings and etc.

Like calendar having three options Organizer, Calendar and Calendar All.
1) Calendar – In calendar specific user can see his daily tasks in the organization that he has to done. For e.g. Human resource person can check the checkbox of department list assigned to him and his daily tasks is seen.

Also user can sort these tasks by dragging it.
2) Calendar – In calendar user could open his daily routine tasks to remember the whole day schedule, it is the best approach to organize your whole day work.
For this user need to right click and select New to item option.

By clicking on “New Todo item” form will open where user can fill subject, Start time, end time and Tenant (For organizing calendar Company or personal) and click on submit button.

Also if user would like to add recurrence for this task he can check on recurrence option where he can set the recurrence hourly, daily, monthly and yearly. Also if he wish to set the default recurrence than he could to this also.

Kindly note new recurrence to-do item is same where you can add date and time.
3) Calendar All – In an organization if authorised person would like to see his employee’s daily tasks than he can see by using calendar all option.
For an e.g. HR person can see employee’s daily tasks who reported under him.

How to Use WorkSpace
WORKSPACE DOCUMENTATION
Introduction
WorkSpace is User’s individual space where user has got all his Tasks, complains, Assignments, list of Training's and Milestones to achieve. WorkSpace offers the following unique features which other management tools do not contain, these are:
Ticket Management – Complete complaint management solution starting from raising a ticket for follow up with concerned authority and finally closing it with the solution.
Meetings - Effective meeting solution, by making agenda clubbed with calendar and attached to strategy management.
Calendar – One can see two calendars at a time (Personal and Business linked to strategy Map. Easy to delegate tasks from your calendar to another user falling in same group.)
Milestones –Different benchmarks (Projects or tasks) have been set by the head of the company that everyone has to achieve, also one gets the appreciation if he achieve it on the given time.
a) Guide: Guide will give you the idea about the particular action item. It contains Title name, overview, what to do, how to do, purpose and achievable.

b) Discussion: If you would like to discuss about the particular action item you can simply forward it to the recipients by simply click on add new message

c) Help: As per name, help will give you the idea about the current action item.
d) KPI Score: KPI score will give you the score of the person by validating different parameters set by the company and according to it one can measure the performance of respective user/employee within the organization.

e) Checklist:Checklist will help you to figure out what to do and what not
As the user clicks on Workspace, he can view his workSpace as shown below-

WorkSpace comprises of-
- My Hub
- Initiative
- Meeting Agenda
- My Training's
- Checklist
- Checklist Master
- My Task
- Milestones
- Approve
- Closed
Let’s analyze each tab individually here-
My Hub-
My Hub is a collection of the User’s Tasks, work he is supposed to do, assigning and approval of work.

On Expanding My Hub, the User gets to explore four areas those are-
1. Current Actions User can view his ongoing work and reply to conversations those are pending.
2. New Task- The user can open new task which he wishes to achieve.
3. Assigned- The user can view the tasks those are assigned to him.
4. Assigned Approve- This is where the user approves of certain roles those are given to him.

Current actions: Here, user can view his ongoing work and reply to conversations which are pending.
This is how the user can reply the message in current actions.

User has to click on add new message and then he can write the message by selecting participant. Also user can give rating from 1 to 5 according to the work done however if rating is below than 3, one form will open where user has to write the reason of bad rating and automatically that complain will get open again.
New task: One can see his/her open complains (Complains have to resolve) in the new task option, these complain raised by the user who has authority to forward it to the right person.

These are complains in the New task option however if one accept these then it will go automatically to complains section which is under milestones tab.
Initiative-
Initiative is when the User decides his possibilities of work, his capabilities and designs a Work plan to achieve these Goals.

Initiative consists of two things-
1. To Decide: The user decides as to what all he can do.
2. To Achieve:Once the user has decided as to what all possibilities he has got, he can then work out a strategy to achieve those goals.

Meeting Agenda
The user decides on a list of things those are to be discussed in a meeting in this particular section.

Meeting agenda consists of-
My Training-
The user can view all his Trainings which he wishes to participate in this tab.

My Training-
The user can view his Trainings under this tab

Checklist
Checklist lets the user to match his work with the To-do list he makes. He can check whether anything is missed out or not, some unfinished tasks which needs to be completed.

Checklist Master-

My Task-
This tab specifies the user’s task and has various sub-categories in it.

My Task consists of-
1. To Complete- Tasks which are pending to be completed can be viewed here.
2. Delegated Assign- The task which assigned to some other person on behalf of other, in other words task assign to the back up of the person who is not present.
3. Pending Approval-Task’s which the user has done, but awaiting approval.
4. Upcoming- Future Tasks.
5. Pause- Tasks which has paused as they aren't important right now but will be doing in the future.
6. To Check-These are the tasks which display the Checklist Items.
7. Owner- Owner has the rights to assign and approve the tasks.
8. Finished- Work which the user has finished.
9. Complete- Task does complete comes in this category.
Milestones
As we know Milestones are measurable and observable and serves the purpose of progress monitoring, the user can set his Milestones in this section.

Milestones comprises of
1. Reservations- The user can check the Reservations from here, which was punched by using Submit Enquiry from Tiptop Mail.
2. Complains- User can review all complains raised by different persons that related to him and resolve it with the required action.
3. Defects & Appreciations-User can view his own achievements and defects.
4. Projects- All projects assigned to the user can be viewed here.
5. Pending- All the tickets which are pending for approval can be seen here.
6. Completed-Tasks which are completed appear here.
7. Owner- User can view his Ownership in various Projects.
Approve
The user can approve all the tasks assigned to him.

Sub-categories of Approve are-
1. To Approve-User has to approve the assigned or authorized to.
2. Delegated Approve- Some other person who took responsibility on behalf of you approving tasks.
Closed
Work which is completed from the User’s end will appear in Closed Tab.

How to Use Calendar
CALENDAR
Calendar is used to organize the organizations schedules, meetings and etc.

Calendar having three options Organizer, Calendar and Calendar All.
1) Calendar – In calendar specific user can see his daily tasks in the organization that he has to done. For e.g. Human resource person can check the check box of department list assigned to him and his daily tasks is seen.

Also user can sort these tasks by dragging it.
2) Calendar – In calendar user could open his daily routine tasks to remember the whole day schedule, it is the best approach to organize your whole day work.
For this user need to right click and select New to item option.

By clicking on “New To do item” form will open where user can fill subject, Start time, end time and Tenant (For organizing calendar Company or personal) and click on submit button.

Also if user would like to add recurrence for this task he can check on recurrence option where he can set the recurrence hourly, daily, monthly and yearly. Also if he wish to set the default recurrence than he could to this also.

Kindly note new recurrence to-do item is same where you can add date and time.
3) Calendar All –In an organization if authorized person would like to see his employee’s daily tasks than he can see by using calendar all option.
For an e.g. HR person can see employee’s daily tasks who reported under him.

How to use Roaster Module
Company Roaster
At the time of company creation, company roster need to define as per roster policy. Below policy points need to define:
- Open Time and Close Time – Specify Time as per policy
- Weekly Off Per week – need to specify no. Of weekly off in a week as per policy
- Weekly Off – Need to specify the day for weekly off as per policy
- Half Hours – specify half day time as per policy
- Absent Hours - specify absent time as per policy
- Number of Breaks – specify no. Of breaks as per policy
- Number of holiday – specify no. Of holidays as per policy
- Minimum and Maximum Break Intervals - Specify Time as per policy

Attendance Status:
Admin can create and name attendance status based on Attendance Type (Meta Data). Company Admin can Name any Attendance Type based on Company Attendance System (Policy)

- Here, in this form admin has to define Attendance policies of company. Like Attendance type, working hours, Half day working hours, Absent working hours, etc.
- This form is used in marking employees’ attendance and from the same form admin will define the irregularity and Shift policies within the company.

- Attendance type can be selected from the drop down menu item as Absent, Absent on working day, Holiday, Justified, Leave or Leave with pay etc.
Irregularity Status:
It is rule setup form helps in managing discipline of company by checking employee irregularity. It helps in naming irregularity based on Irregularity status (Meta Data)

- Using this from admin can set policies for Irregularity in attendance status.
- First admin need to select the company from drop down for which he want to set policy.
- Select Irregularity Type from drop down menu as Indiscipline, Justified or not justified etc.
- Check the Paid or Restricted option on irregularity.
- Define working hours, absent hours, Half hours and early absent hours.
- Click on save button to save the form data regarding Irregularity status as defined by admin.
Shift Irregularity:
This is disciplinary monitoring form where all Employee Attendance Irregularity will display and admin can view, edit and correct the attendance status. Employee shift is already assigned to all employees within the organization and if employee check-in/ checkout out of that sift than it will be displayed in this form and admin will approve or mark irregular status against that particular irregular employee.

- On this form first admin will select the company in which he wants to correct/ edit irregularity.
- Than admin will select the department within that company and then will select the employee from drop down or direct by selecting department, it will display the list of irregular employees within selected date range only (date range will also been selected by the admin)
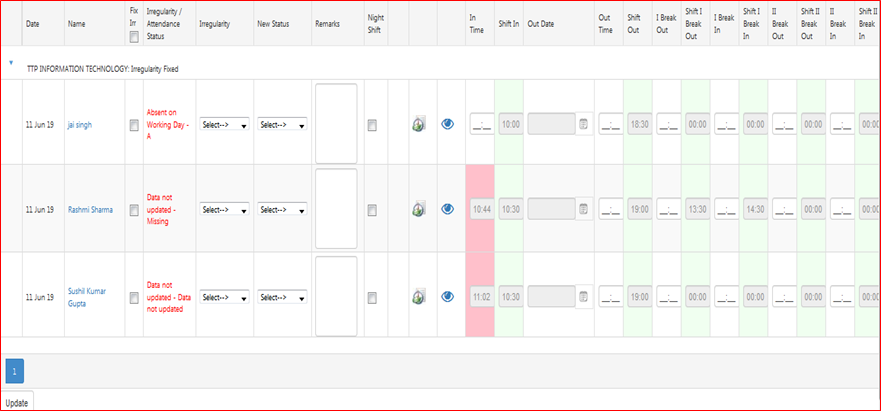
- On this form irregular employees list will be displayed with their marked attendance. Allocated In time and Out time also be displayed in that from, and employees actual marked in time and out time record will be shown here, including employees break time, shift break time, allowed shits etc.
- Admin or supervisor will check the status and verify the same with employee regarding his/ her irregularity and he can update the status accordingly as Justified, not justified, Half day, leave, emergency leave, on duty, in discipline etc.

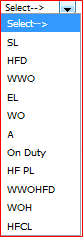
- We have given an option to select the date for which irregularity needs to be corrected and option is there where if employee has not marked his/ her attendance than once verified by the supervisor he can mark his/ her in time and out time manually in the space provided o this form.
- Once supervisor inserts the required remarks and status in irregularity form with respect to irregular employee, he will click on Update button and this record will be saved.
Approve Overtime:
Using this form admin will approve and update overtime for respective employee, if that employee is allowed to take benefit of over time.

- Admin first have to select date range in which employee is allowed or worked over time (beyond his/ her shift)
- Admin will select the company from drop down in which particular employee resides.
- From Name drop down menu item, admin will select the name of employee to who over time has to be approved.
Leave Type:
Admin can create and Name leave from Attendance Status marked under leave.
This form will be used to setup leave type and to make that active too in leave group.

- Admin will select the company and leave type from the drop down menu.
- Based on selected leave type its display name will come automatically inside the provided text box.
- Description can be written at given text box regarding that leave type.
- Now admin will check weather this leave type is Holiday, Paid or restricted by marking check on desired check box.
- If that leave type is paid than admin will define the paid percentage here. And by clicking on Active check box, admin will click on Save button to save that leave type.
Leave Group:
Admin can create and Name leave group with combination of Attendance Status and these leave group will be linked to employee based on company rule.

- Admin will select the company name from drop down menu and attendance type and leave type will be displayed on this form.
- Now admin will select the option of defining leaves like day wise, weekwise, monthly or yearly basis from the drop down menu.
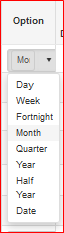
- Once option of leave defining is selected now admin will enter the number of working days, Number of leave, work hours, half hours, absent hours, early half hours, and early absent hours in that particular time frame.
- Than he will enter the description about that template of leave group.
- Admin will check the weekly off days as available on the form.
- After entering all above information, he will put the date of effectiveness of that leave group policy and make this active and will click on save button to save this lave group details.
Leave Shift:
Create and Name Single default Shift for Particular Leave Group which will automatically allotted to employee when leave group is attached.

- Using this form admin can create default shift under particular leave group.
- First admin will select the company from drop down menu for which he want to create lave shift. And then admin will select the particular leave group from drop down under which he is creating leave shift.
- Shift date range he will select from the option given and then he will click on Submit button to save this record.
Shift Master:
This form is for defining Shifts. Admin will setup employee shift with breaks

- On this form, Company can define its working shifts/ hours.
- Fist need to select the company name from drop down menu. Then admin will select Leave group and attendance type from drop down menu.
- In Shift Time, admin will enter the working hours, In time, out time and number of breaks he wish to allow.
- IN Break section, need to enter out time and in time during the break.
- Here, admin can also enter Lunch or Dinner shifts in time and out time wise.
- Also here check the week day for week off holiday here too.
- IN others section: Admin can define the rule of marking Absent or Half day depending upon the hours any employee worked in a defined shift. For Half day admin can define that minimum how many hours needed to consider his attendance in half day and how many hours needed for absent status consideration.
- Click on SAVE or Update button to save this record as shift status.
Employee Shift Assignment:
Here, admin will define particular employees working shift.

- Admin will select company first in which that employee resides.
- Once company is selected, respective department will be displayed in department drop down and admin will select the department than he will select particular employee from the list whose shift admin want to assign.
- Admin will select the period for which he is willing to assign shift for.
- Finally admin will click on Submit button to open the page from where he can set and assign employee shift.
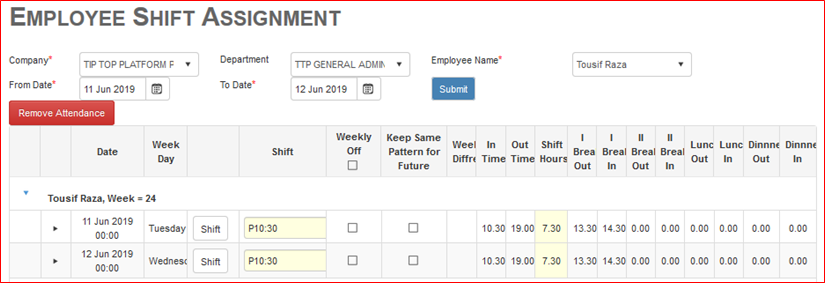
Leave Application:
Using this particular form supervisor or reporting authority can apply for leave on behalf of under supervision employee. On this form employees’ leave balance will also be displayed.

- Supervisor/ admin will select the name of company first under which that employee designated.
- Select the name of employee from the drop down menu item. And employee code will be displayed on this form below employee name.
- Than admin will select the Leave type, leave date range, number of days from the provided menus.
- Admin will enter the reason for leave along with address while employee will be on leave.
- Now admin will click on Submit button to save and to send this leave application to next level for approval.
Leave Application Status:
Here, admin can see the approved or rejected leave status of applied leaves. Employee name, employee ID, applied leave date; reason will be displayed there including its current status.
Approve Leave Status:
Using this form the admin or the designation that is authorized to approve any employees’ leaves can approve or reject leaves as applied.
- On this form admin can search the pending application, approved application and discarded application as well.
- Form will display the available and applied leaves with employee leave details as he filled during leave application as name of employee, department, leave type, date and reason for leave.

- Admin will click on Approve link to approve particular leave application or he can click on discard link to dis approve as well.
Approve Earned Leave:
This form is used for generating process to calculate the leave credit and debit in specified time interval based on allowed leave policies like setoff rules leave groups, etc. Whatever the leaves any employee has earned, admin will manually approved from this form, only approved leaves will be shown and available to that employee during his payroll generation.

- Select the company name from the drop down menu and select the employee name from respective company.
- Enter the date from and to, for which time interval earned leaves to be approved.
- Click o Load Data form to load the leave balance employee earned in that particular time interval.

- On this form day wise leave credit will be displayed as per the payroll rule defined earlier.
- Leave type and Credited/ earned leaved day wise will be displayed here.
- Admin can approved those earned leaved from Approved section. He can adjust those earned leaves too.
- Put the remarks if any based on approval.
- There is an option to approve multiple credited leaves at once, select the check box at once which leaves have to be approved and click on Run Payroll rule button given at the top.
- By this way leaves will be credited and approved against that employee in particular time interval.
How to use Checklist
How to Use Check List
Purpose:
To create, add and use checklist for completion of task aligned to company strategy.
Form Used:
- Checklist Maste
Purpose: All checklists are stored in this page and is a Master database of company checklists.
- Checklist Item Master
- Checklist Item name Master
Purpose: All checklists Item Name are stored in this page and a Master database of company checklists item name library.
- Checklist Template Master
- Checklist Category
- Checklist Sub Category
- Checklist Group
How to Do:
1. Go To Checklist Master Page: and click on "+ Add New Checklist button" and fill below fields showing in figure-

a) Name: Here, user has to provide a name to that particular Checklist.
b) Description: To add checklist description
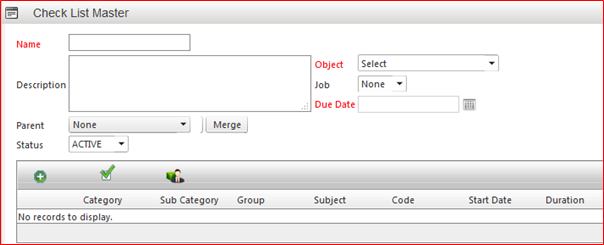
c) Parent: For Template Purpose. (Where user want to show and link this checklist particularly)
d) Object: Select item as per nature of checklist.
e) Status: Select Active.
f) Due date: Add the checklist due date for operation
2. Go to Checklist Item Name Master page and click on + Add New Checklist Item name button and fill below fields showing

a) Name: User enters the name of checklist item using this.
b) Description: To add any detail description about checklist item name
c) Specification: To add any detail specification about checklist item name
d) Checklist category: Select category as per nature of checklist.

e) Checklist Sub category: Select sub category as per nature of checklist
f) Checklist group: Select group to separate grouping checklist work
g) UOM: Select unit of measurement for eg. Number
h) Sequence: To add sequence in checklist name.
i) Status: select Active
3. Go To Checklist Item Master page and click on + Add New Checklist Item button and fill below fields showing

a) Select Category: Select category as per nature of checklist for eg: Work Item selected
b) Select Sub Category: Select sub category as per nature of checklist
c) Select Group: Select group to separate grouping checklist work
d) Name : List of all name List display created under group
e) Department: select Department
f) Owner : select Owner
g) Location category : select Indoor or outdoor

h) Location : Select the location from drop down
i) Item Code: Automatic generated by System.
j) Status : Active
j) Description : To add any detail description about checklist item name
k) Specification : To add any detail specification about checklist item name
k) UOM Select unit of measurement for eg. Number
l) Save
m) Cancel
4. Go back to Checklist master Form to add Checklist Item and resource in checklist.

5. To add Checklist Item and resource.
Showing 2 tab for adding ; general i.e. Checklist Item and Resource

- Select category Select category as per nature of checklist for eg: Work Item selected
- Select Sub category Select sub category as per nature of checklist
- Select group Select group to separate grouping checklist work
- Name : List of all name List display created under group
- Department: select Department
- Owner : Select Owner
- Location Category : select Indoor or outdoor
- Location : Select Location from drop down
- Assigned To – select title user who will perform this work
- Owner – select work owner
- Status – Active
- Form URL – any url add in checklist
- Activate After
- Item Code – Generated by system
- Attachment – any document to attached
- Remarks - For adding any remarks
- UOM – Select Number
- Quantity – Select 1
- Factor – Select factor None, selection for work item which affect any one in list
- Recurrence – Apply recurrence – For eg: Daily
- Insert - Button use to insert above data
- Update – button use to update above data
- Cancel – button use to cancel data
6. Add Resource Item in Checklist work Item.
Image showing Resource tab for adding resource Item in checklist.

Click on + Update List for adding Resource Item

Select resource item by tick check box preceding resource item
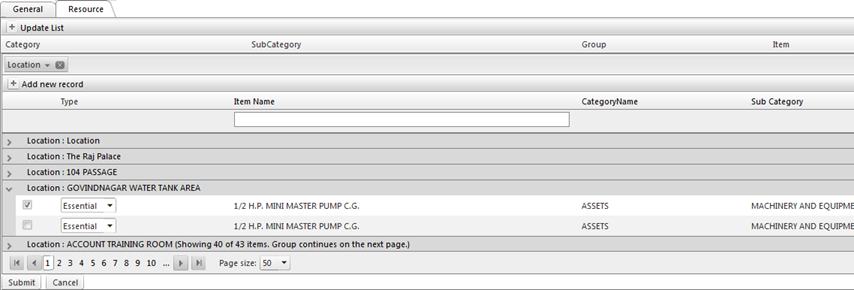
Update selected resource list
Image showing resource list selected from location

7. Click on Submit button, bottom left of form to add the selected resource item in checklist.
8. Go To tab general and then select Update to add resource item and general item in checklist.
9. Then Select Update Bottom Right button to update checklist.

10. To link checklist with task.
Note: Only task owner can edit and update checklist in task.
Go to WorkSpace and go to owner Page in task form.
Image showing task form where checklist is added

Image Showing task Form is saving having checklist added.

How To Use Ticket Management
How To Use Ticket Management
Ticketing system that makes customer service easier and cost effective
Customers reach out to you every day, with multiple questions about your products. Using support ticket software is essential to keep track of all these requests, resolve them, and leave the customers happy with your service. With Tip Top’s Ticketing Tool, you can breeze through all of it with time to spare.
- Keep track of conversations
- Increase your team’s productivity
- Help customers help themselves
- Support across channels
- Resolve issues together
- Measure and improve efficiency
- Meet SLA's on time, Guarantee End-User Satisfaction
- Solve IT Incidents Faster, Enhance Service Quality with the Knowledge Base
- Prioritize and Organize Tasks and activities
- Automate Repetitive Tasks
Tip Top Ticket management application enables you to manage Ticket life-cycle from Ticket initiation, assignment to closure in a very simple way.
TTT allows you to create a unified, closed-loop Ticket management system for tracking Tickets across processes, departments, and geographical locations and by automating all Ticket-related tasks, such as data collection, notification, follow-up, and escalation based on RACI.
Tip Top’s Ticket Management System integrates all the tools necessary to ensure prompt and seamless resolution of customer inquiries. The more you automate, the more your service reps can focus on what is important – creating exceptional customer relationships.
Our help desk ticketing system enables you to automate processes that are best managed through system driven resources, so your service team can focus on engaging customers and helping them get the most out of your product.
Functionalities in TT Ticketing System
- Email Integration
- Ticket Automation & Workflows
- Customizable Ticket Page
- Custom Fields, Statuses & Properties
- Ticket allocation and role distribution (Department Linking)
- Authorities and Responsibility mapping
- Organization Strategy Linking
- Resolution Time Set Up
- Communication & Alert setup
- Ticket Notification
- Escalation Mechanism
- Performance and Rating Reviews mechanism
Tip Top’s Ticket Management System Work Flow:

Ticket Setup (Set help desk standards)
Scope:
- Design and define help desk objectives or Organization Strategy to meet business goals.
- Meet customer expectations with single or multiple SLA's
- Measure help desk performance with time tracking
- Create Custom views for support reps
- Customize ticket forms and templates as per strategy plans
- Customize Ticket Forms to suit business needs
- Assign and set Department and role for ticket Resolution
- Add and allocate roles and responsibilities within the department to resolve the ticket and to have more eyes on the customer
Steps:
2. Click on Add New Complaint Type option item.

3. Enter the name of Complaint type
4. Enter the description about complaint type if any
5. Select the Parent of particular type of complaint from drop down like this particular complaint falls under which menu item or module
6. Select the company from drop down under which this complaint belongs or created
7. Select the Department for which this complaint is to be linked with
2. Click on Add New Complaint Type option item.
8. Select the Group of contacts responsible for that complaint like employees, suppliers, customers etc.
2. Click on Add New Complaint Type option item.
9. Select the Responsible person from drop down who is responsible to handle or to attend that complaint/ to resolve that complaint.
10. Select the Inform: Inform is the person who has to be informed or intimated for the resolution of that complaint
11. Select the Complaint Owner from the list in drop down
12. Enter the time period to resolve that complaint
13. Select the Form name and make status as Active
14. Select the initiative as already defined which belongs and linked with this particular complaint type
15. Select and check the designation to which complaints mail or resolution’s mail has to be sent from the drop down menu.
16. Enter Phone Number, Display message or Action in the provided test box
17. Click on Submit button to save this complaint type.
Utility of Complaint/ Ticketing Module:
Complaints posted by users will be notified to responsible/ Group through TT WorkSpace- Tickets.
‘E Mail & Message’ integration of Tickets (Ticket Message Receive By Responsible User/ Group)
- Manage multiple mailboxes in one place containing the raised ticket/complaints
- Bring conversations from multiple email addresses into a single help desk for faster resolution.
- Route tickets to the team best equipped to handle them using smart ticket assignment features.

Complaint Escalation Mechanism
Ticket Can be handle by individual or Group With Escalation Mechanism with help of message and Forward Functionality.
Ticket Forwarded From One User to Another with Communication on Action Messages Thread and Finally Resolved and Completed from User WorkSpace
Approver User – Check Quality of Ticket resolution and Give Rating.
And Complete Ticket
Steps:
1. Right click on complaint and user will get the option as Edit, Forward To and Close options.

2. Click on Edit button to ‘Edit’ the posted complaint

3. User can edit the complaint and resubmit the same. (Same page/form to register the complaint)
4. Click on ‘Forward To’ option.

5. In Subject line the concerned Complaint will be displayed
6. Select the Role from drop down to who that complaint is going to be forwarded to like Responsible, Inform or to Assign.
7. Based on Selected Role: ‘Forward To’ will displace the concerned designation/ employee or role that is going to receive that complaint.
8. Click on Forward button to forward that complaint to other authority.
9. Once forwarded the same complain twill be displayed in concern person’s workSpace.
10. Click on particular complaint from workSpace
11. This will open message window from where remarks or resolution can be send to group or owner or to Inform.

Submit Complaint/ Submit Ticket:
To submit ticket/ complaint there is an option provided in all TT applications under User name Tab as “Submit Ticket”
Click on Submit ticket option and the form for submitting complaint will be displayed
Steps:

1. Select the Company for which user want to submit the complaint for from the drop down menu.
2. Select the category of complaint from drop down menu.
3. Based on Selected Category- Sub category will be displayed in next drop down (sub category): Select the sub category from drop down menu
4. Enter the Subject line for complaint.
5. Enter the Date of Complaint
6. Select the parent name of complaint (parent name which was created in complaint master form)
7. Select sub parent from drop down menu
8. Enter Reminder time if user want to set reminder for particular complaint to receiver
9. Set the priority of submitted complaint as High, Medium or Low.
10. Select the reproducibility of that complaint as Always, sometime, random time etc.
11. If user wants to attach some screenshot or image explaining the occurrence of that complaint than Embed Image option is there using this image can be attached with complaint.
12. There is any editor too on the complaint page where user can describe the issue relating to that complaint
13. Click on Submit button to save and post that complaint.

How to use Hand Over plugin
Hanover and Take over is basically a tool for majoring Responsibility management and Transfer
Handover:
This form is used to transfer of department charge (Handover & Takeover of department charge) Form define important information for both successor and predecessor.

- For employee motivation at the time of handover, person who is transferring his duty to takeover employee, there is an option to select the memorable story from the drop down which is already saved on Guide page.
- Once the department is selected, a tag will populate on the screen which will display the current status of hand over and take over within that department. It will show that particular department’s handover is with which employee and who is going to take over that along with the date and time to transfer the handover/ takeover activity.
- Select the name of employee who is going to take over the charge now from (responsible employee name will automatically be displayed there in drop down menu)
- Now, both the handover and take over employees needs to enter their passwords there and click on Submit button to finish the handover/ takeover process.
Pending Complaints/ Pending Tasks:

- During the time of Handover/ take over this form will display the pending complaints related to that department, so that take over employee will come to know the exact status of complaints pending at that time which needs to be addressed.
- Searching/Sorting option is available on that form to sort the pending tasks, upcoming tasks, current or not yet generated tasks, active or passive tasks etc.
- This Form will also show the task start date, end date, due date, responsible employee name, approver or owner etc.
Insert/ Update Attendance Entries:
- Using this option authorized person can insert or update its department’s employees grooming and ranking too. Attendance can also be updated using this form option if employee within that department has not marked their own attendance.
How to use CPM
Concept Behind 'CPM' Module:
Everyone in the organization is automatically linked to the strategy Map so everyone understands the goals and their role in that plan and the benefits that would come related to them. We are able to include employee latent and aspirational needs gather information from appraisal questionnaire and using AI to help in succession planning. Thus changing an employee individual goals to team goals and further team goals to organizational goals - the thinking shifts from forcing employees to managing employees.
The CPM module has a strong activity engine that helps in delegating a plan to actions and simultaneously creating score for KRA and KPI.
Once all the strategic planning has been made, the plan has to be executed which is done by people. Hence, the company requires people to work to accomplish the goals.
To get the people, the company needs to segregate these work requirements on the basis of different Tasks , Functions and Responsibilities so that it can find the right person to do the right work based on the required competencies which may be educational, experience, skills, endurance, etc.
The CPM provides a Utility based Business planning engine that helps create Mission statements broken into objective statements followed by measurable strategic Plans.
Create Strategy:
Once organization titles are created then strategy can be created and planned down with Goal, Objectives, Initiatives and Tasks.
Organizational Goals will be defined here initially and based on those goals Objectives will be created I order to achieve those goals. Further to that Objective will be divided into Initiatives than Task; Milestone will be created to achieve those initiatives. Objectives could be grouped by perspectives itself.
- On initial screen this will give the company name for which goals, objectives need to define.

- Right click on company name and Select the option from the list.

- Click on New- Map option to create a new strategy map.

- Select the job from the drop down menu item. (this will come from guide page of job if created already there)
- Enter the Name of Strategy Map user wish to enter.
- Enter the description regarding that Strategy Map.
- If that strategy is linked with Appraisal Form, check this option.
- Select the status as ‘Active’ and click on ‘Save’ button to save this strategy map.
Create Perspective:
- Click on New- Perspective option to create a new perspective under any Strategy Map.

- Select the Job from the drop down list (this will come from guide page of job if created already there)
- Enter the name of Perspective along with its description.
- Select the strategy map under which this perspective come or relates.
- Mark the status as ‘Active’ and click on save button to save this record.
Create Objective:
This form is used to create particular objective based on organizational Goals.
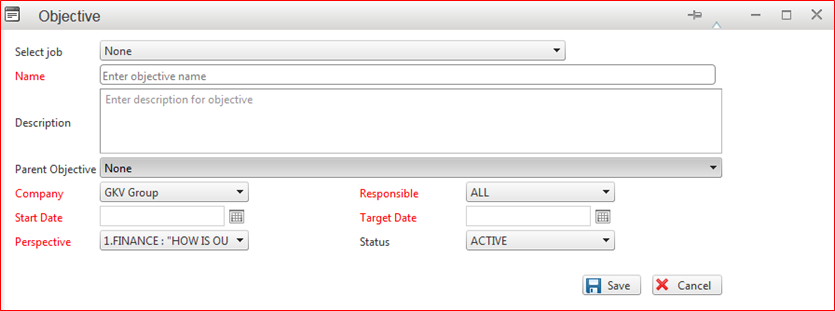
- Select the job from the drop down menu.
- Enter the Objective Name and its description. Select the Parent objective if created already, otherwise leave it blank.
- Select the company for which this objective is created from the drop down.
- Define Start Date of this objective and define Target date too.
- Select the Responsible name from the drop down menu. (responsible designation will be displayed in the drop down and here need to select the responsible designation for that particular objective)
- Select the Perspective from the drop down under which this so created object falls.
- Select ‘Active’ as status and click on ‘Save’ button to save this objective into record.
Define Initiatives:
This form is used to define initiative against any particular Objective as defined for specific goal of organization.

- Select the job from drop down menu item.
- Enter the name and description of Initiative to create.
- Select the Objective under which this initiative comes including Child objective if created earlier.
- Select the department this initiative belongs to.
- Select the location of that department from the drop down menu.
- Select the responsible title (virtual designation) from the given drop down menu; Select the Decision maker too from the drop down menu.
- Select the Initiative if it affects to any particular initiative.
- Select the Status Algorithm from drop down like manual status, average status, worst status, best status, first or second status etc.

- Select the progress algorithm too from the drop down menu.
- Select the visibility as true or false, and also select the authority from the drop down menu.
- Select the Meeting from drop down if there is any particular meeting is already defined against this particular initiative.
- Select the approval method as Manual or automatic.
- Select the status as ‘Active’.
- Enter the priority and select the affected Objective from the drop down menu.
- Enter the Due date and Start date of this initiatives.
- Select the KPI from the drop down menu, by which this initiate is linked.
- Click on ‘Save’ button to save this Initiate.
Create Task:
Through this form Tasks can be created in order to achieve any initiative/ objective based on organizational goals.

- Select the Job from drop down menu if create inside guide page.
- Select the form from drop down menu if that form is available inside guide page related to this task.
- Enter the Subject of task going to create. Also enter the start date for performing that task and the duration in days or hours.
- Select the company name from drop down menu under which this task falls; Select the department, category and location from the drop down menu.
- Set the priority as low/ high/ medium from drop down. Select the Approval method as manual or automatic and select the completion process of any task as manual or online.

- Set the remind if any, select the Status as ‘Active’ and if this affects any Objective than select the objective as already created from the drop down menu.
- Select the responsible Title (virtual designation) for that task from the drop down menu.
- Check if this task should be allotted automatically or select Must Allot option on form.
- Select the flexibility of that task as controllable or UN controllable.
- Select the Tracking option for particular task as Time variant or time in variant.
- Select the ‘Inform’ Title and Owner of that task from drop down menu.
- Enter Help, Tutorial or URL related to that task if available. Select Checklist from the drop down too.
- Select the initiatives and KPI from the drop down menu, Link this Task with any KPI to check the performance in appraisal.

- Later doing this, there is a list of available tasks and here, admin can select the particular task from the list to make child task.
- If this task is recurring task than check on recurrence option and if that task is allowed for forwarding than check on Forward Task option.

- Finally, click on ‘Save’ button to save this task.
Create Milestone:
Using this form Milestone can be created against particular KPI or Initiative decided as per organizational goals.

- Select the Job from drop down menu and Form name if available inside Guide page; this will come from the guide page.
- Enter the Subject of Milestone and enter the Start date and end date of project/ milestone.
- Select the company name, Department and Location from the drop down menu including priority of that milestone/ project.

- Set reminder, put the status as Active and select the category if any from the drop down.
- Select the approval method as Manual or Automatic.
- Select the responsible Title and KPI by which admin want to link this milestone.

- Select the Flexibility mode, tracking method, owner of that milestone.
- Enter the Help, Tutorial and URL if any related to that Milestone.
- Select the Initiative from drop down under which that particular milestone falls.
- Later doing this, there is a list of available tasks and here, admin can select the particular task from the list to make child task.
- Click on ‘Save’ button to save this milestone.